Last Updated on August 7, 2025
To clean a thermocouple, carefully disconnect it, remove any debris or buildup, and gently wipe it with a soft cloth or brush. A thermocouple is an important component in gas-powered appliances that detects the presence of a pilot light.
Over time, it can become dirty or coated with soot, affecting its performance. Regular cleaning can help maintain its functionality and ensure the appliance operates efficiently. By following a few simple steps, you can effectively clean a thermocouple and help prolong its lifespan.
Read on to learn the proper method for cleaning a thermocouple and improve the performance of your gas-powered appliances.

Credit: www.usawaterquality.org
The Importance Of Cleaning Your Thermocouple
Cleaning your thermocouple is essential for proper functioning and safety. Learn how to clean a thermocouple effectively to ensure its longevity and accurate temperature measurements.
Gas appliances play a crucial role in our daily lives, providing us with heat and allowing us to cook our meals. At the heart of these appliances lies the thermocouple, a small but vital component that ensures our safety by shutting off the gas supply if the flame goes out.
However, many homeowners overlook the importance of cleaning their thermocouples regularly. In this section, we will explore the role of the thermocouple in gas appliances and how a dirty thermocouple can negatively impact the performance of your appliance.
The Role Of The Thermocouple In Gas Appliances:
- Acts as a safety device: The primary function of a thermocouple is to act as a safety device in gas appliances. It detects whether the pilot flame is lit, allowing the gas valve to remain open. If the flame goes out, the thermocouple senses the drop in temperature and sends a signal to the gas valve to shut off the gas supply, preventing any potential hazards.
- Generates an electric current: A thermocouple consists of two different metals joined together, which creates an electrical voltage when heated. This voltage is used to power the electromagnet in the gas valve, ensuring that it remains open as long as the pilot flame is burning.
- Provides temperature measurements: The thermocouple also serves as a temperature sensor, providing continuous temperature measurements to the gas control system. This information helps maintain the optimal temperature for the appliance to operate efficiently.
How A Dirty Thermocouple Affects Appliance Performance:
- Reduced heat output: Over time, dirt, soot, and other contaminants can accumulate on the surface of the thermocouple. This buildup acts as an insulator, preventing the thermocouple from generating sufficient voltage. As a result, the gas valve may not receive the required electrical signal to stay open, leading to a reduced heat output from the appliance.
- Unreliable flame detection: A dirty thermocouple may struggle to detect the pilot flame accurately. This can cause the gas valve to shut off randomly, even when the flame is still burning. This unreliable flame detection can disrupt the appliance’s operation and affect its performance.
- Increased risk of gas leaks: If the thermocouple is too dirty or damaged, it may not shut off the gas supply when the pilot flame goes out. This can lead to a gas leak, posing a significant safety hazard. Regular cleaning and maintenance of the thermocouple are essential to ensure that it functions properly and prevents any potential gas leaks.
Proper maintenance of your gas appliances, including regular cleaning of the thermocouple, is vital for their efficient and safe operation. By understanding the importance of cleaning your thermocouple, you can ensure that your gas appliance continues to perform optimally while keeping you and your family safe.
Tools And Materials Needed For Cleaning
To clean a thermocouple, you will need a few essential tools and materials. These include a wire brush or fine sandpaper to remove debris, compressed air or a can of compressed air to blow away dust, and a soft cloth or cotton swab to wipe the thermocouple clean.
Make sure to turn off the gas before starting the cleaning process.
When it comes to cleaning a thermocouple, having the right tools and materials is essential for effective and safe maintenance. Here is a list of necessary items you’ll need for cleaning your thermocouple:
- Soft-bristle brush: A soft-bristle brush will help remove debris and soot buildup from the thermocouple without damaging its delicate components.
- Fine-grit sandpaper: Fine-grit sandpaper can be used to gently clean any rust or corrosion present on the thermocouple’s surface.
- Compressed air or a can of air duster: Using compressed air or an air duster can help blow away any loose debris or particles from the thermocouple.
- Cleaning solvent: Use an appropriate cleaning solvent to dissolve and remove stubborn residue such as grease or oil from the thermocouple.
- Safety gloves and goggles: It is crucial to prioritize your safety during the cleaning process. Wearing gloves and goggles will protect your hands and eyes from any harmful chemicals or debris.
Remember to gather all these tools and materials before starting the cleaning process to ensure a successful and efficient outcome.
Step 1: Safety Precautions
In the first step of cleaning a thermocouple, it is crucial to prioritize safety precautions to avoid any potential hazards. By following these guidelines, you can ensure a safe and effective cleaning process.
Importance Of Turning Off The Gas Supply
Before you start the process of cleaning a thermocouple, it is crucial to turn off the gas supply to the appliance. This step is essential to prevent any accidents or gas leaks. Neglecting to turn off the gas supply can lead to hazardous situations and compromise your safety.
Make sure to locate the gas shut-off valve near the appliance and turn it off before proceeding with the cleaning process.
Ensuring The Appliance Is Cool Before Starting The Cleaning Process
Cleaning a thermocouple requires you to work with a cool appliance. It is important to ensure that the device has had ample time to cool down before initiating the cleaning process. This prevents any risks of burns or injuries while handling the thermocouple.
Wait for at least thirty minutes after turning off the gas supply to allow the appliance to cool down before proceeding with the cleaning steps.
To ensure a safe cleaning process and maintain the longevity of your thermocouple, follow these steps:
- Turn off the gas supply: Locate and turn off the gas shut-off valve near the appliance to prevent any gas leaks or accidents.
- Wait for the appliance to cool down: Allow the device to cool for at least thirty minutes before starting the cleaning process to avoid any burns or injuries.
- Gather the necessary tools: Prepare the required tools such as a soft-bristle brush, compressed air canister, and a vacuum cleaner to properly clean the thermocouple.
- Remove the access panel: Depending on the appliance, carefully remove the access panel to gain access to the thermocouple.
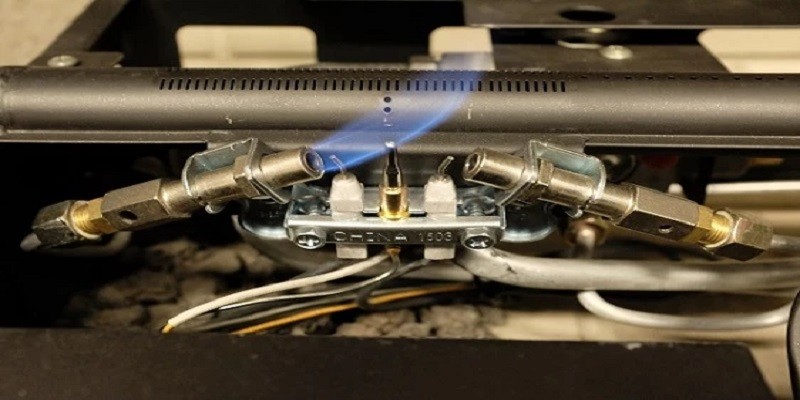
- Locate the thermocouple: Find the thermocouple, which is a small metal rod located near the pilot light assembly.
- Inspect for any damages or debris: Check the thermocouple for any signs of damages, corrosion, or debris buildup. If there are significant damages or excessive buildup, it is recommended to replace the thermocouple.
- Clean the thermocouple: Gently clean the thermocouple using a soft-bristle brush to remove any dirt or debris. Ensure thorough cleaning without damaging the delicate structure of the thermocouple.
- Clear surrounding area: Use a vacuum cleaner or compressed air canister to clear any debris or dust from the surrounding area of the thermocouple and pilot light assembly.
- Reassemble and test: Put the access panel back in place, reassemble any removed parts, and turn on the gas supply. Test the appliance to ensure that the pilot light ignites properly and the thermocouple functions correctly.
Remember, following these safety precautions and cleaning steps will help maintain the efficiency and performance of your thermocouple, ensuring a long-lasting and safe appliance operation.
Step 2: Removing The Thermocouple
To clean a thermocouple, start by removing it carefully. This step is crucial in maintaining your device’s efficiency and optimal performance.
When it comes to cleaning a thermocouple, the second step is to carefully remove it from the gas appliance. Follow these instructions to safely disconnect the thermocouple:
Locate the thermocouple on the gas appliance:
- Identify the position of the thermocouple on your specific gas appliance. It is usually situated near the pilot light assembly.
- Look for a thin metal rod attached to the gas control valve, which is the thermocouple.
Turn off the gas supply:
- Prior to removing the thermocouple, ensure that the gas supply to the appliance is turned off. Shut off the gas valve connected to the appliance.
Disconnect the thermocouple:
- Use an adjustable wrench or an appropriate tool to loosen the fitting connecting the thermocouple to the gas control valve.
- Gently unscrew the thermocouple from the gas control valve by turning it counterclockwise.
- Be cautious while removing the thermocouple to avoid damaging any other components.
Inspect the thermocouple:
- Once the thermocouple is disconnected, carefully examine the rod for any signs of corrosion, dirt, or damage.
- If necessary, clean the thermocouple using the recommended method, as discussed in the previous section.
Remember, safety is paramount when working with gas appliances. If you are unsure about any step, it is always best to consult a professional technician.
Step 3: Cleaning The Thermocouple
To clean a thermocouple, follow these steps: 1. Turn off the gas supply. 2. Unscrew the thermocouple from the gas valve. 3. Clean the thermocouple with a soft cloth or brush. 4. Reinstall the thermocouple and turn on the gas supply.
It’s important to regularly clean the thermocouple to ensure its proper functioning.
When it comes to cleaning your thermocouple, it’s essential to choose the right cleaning method. There are two options to consider: chemical or mechanical. Let’s take a closer look at each method to determine which one suits your needs best.
Choosing The Right Cleaning Method (Chemical Or Mechanical):
Chemical cleaning:
- This method involves using a chemical solution to remove dirt, debris, and corrosion from the thermocouple.
- Start by carefully removing the thermocouple from the device or appliance it is connected to.
- Prepare a solution by mixing equal parts of vinegar and water in a container.
- Submerge the thermocouple in the solution for about 30 minutes to allow the vinegar to dissolve the buildup.
- Gently scrub the thermocouple with a soft-bristle brush to loosen any remaining residue.
- Rinse the thermocouple thoroughly with clean water to remove any traces of the cleaning solution.
- Ensure the thermocouple is completely dry before reinstalling it.
Mechanical cleaning:
- This method involves physically removing dirt and debris from the thermocouple.
- Begin by disconnecting the thermocouple from the device or appliance.
- Use compressed air or a can of compressed air duster to blow away any loose particles from the thermocouple.
- Inspect the thermocouple for any stubborn residue or corrosion.
- If necessary, use a fine-grit sandpaper (around 400 grit) to gently rub the surface of the thermocouple, removing any buildup.
- Ensure all debris is removed from the thermocouple before reinstalling it.
Tips For Effectively Cleaning The Thermocouple:
- Be gentle: When cleaning the thermocouple, avoid using excessive force or harsh abrasives. Remember that the thermocouple is delicate and can be easily damaged.
- Safety first: Before starting the cleaning process, make sure to turn off the device or appliance and disconnect the power source. This will prevent any accidents or damage.
- Regular maintenance: It’s a good practice to clean your thermocouple regularly to prevent buildup and ensure its proper functioning.
- Inspect for damage: While cleaning the thermocouple, carefully examine it for any signs of damage, such as cracks or breaks. If you spot any issues, it may be time to replace the thermocouple.
- Seek professional help: If you’re unsure about cleaning the thermocouple yourself or encounter any difficulties, it’s always best to consult a professional technician who can assist you with the process.
Remember, maintaining a clean and functional thermocouple is crucial for accurate temperature readings and the overall performance of your device or appliance. By choosing the appropriate cleaning method and following these tips, you can ensure the longevity and efficiency of your thermocouple.
Step 4: Inspecting And Reinstalling The Thermocouple
Inspecting and reinstalling the thermocouple in order to clean it is an important step in maintaining its functionality. Follow the necessary steps to ensure the thermocouple is cleaned properly and performing at its best.
Inspecting and reinstalling the thermocouple is an essential part of the cleaning process. It allows you to identify any signs of damage or corrosion and ensure the proper reconnection and securing of the thermocouple. Follow the steps below to complete this crucial step:
Checking For Any Signs Of Damage Or Corrosion:
- Carefully examine the thermocouple for any visible signs of damage, such as frayed wires or bent connectors.
- Check for any corrosion or buildup on the thermocouple. This can hinder its performance and lead to inaccurate readings.
- Inspect the surrounding area for any loose connections or damaged components that may affect the thermocouple’s functionality.
Properly Reconnecting And Securing The Thermocouple:
- Align the thermocouple tip with the pilot light assembly, ensuring a snug and secure fit.
- Gently tighten the retaining nut or screws to hold the thermocouple in place. Be careful not to overtighten, as this can cause damage.
- Ensure that all connections are secure and free from any bends or kinks that could restrict the flow of gas to the pilot light.
Reinstalling the thermocouple correctly is crucial for the overall performance and safety of your appliance. By thoroughly inspecting it for damage and properly securing it, you can ensure the accurate functioning of the thermocouple and avoid potential issues down the line.
Take your time to complete this step carefully, and you’ll be rewarded with a properly cleaned and efficiently operating thermocouple.
Common Mistakes To Avoid
Discover the essential steps to clean a thermocouple without making common mistakes. Learn how to effectively maintain and improve its performance with expert tips and techniques. Avoid these errors to ensure your thermocouple functions optimally and lasts longer.
When it comes to cleaning a thermocouple, there are a few common mistakes that you’ll want to avoid. These mistakes can not only hinder the effectiveness of the cleaning process but can also potentially damage the thermocouple. To ensure that you clean your thermocouple safely and efficiently, keep the following points in mind:
Overlooking safety precautions:
- Always remember to turn off the gas supply before attempting to clean the thermocouple. This is crucial to avoid any accidents or gas leaks.
- Make sure to wear protective gloves to shield your hands from any potential harm.
- Use a well-ventilated area to clean the thermocouple, as some cleaning agents may emit fumes that could be harmful if inhaled.
Using abrasive cleaning materials that can damage the thermocouple:
- Avoid using abrasive brushes or scouring pads, as they can scratch the surface of the thermocouple and affect its performance.
- Instead, opt for soft-bristled brushes or cotton swabs to gently remove any dirt or debris from the thermocouple.
Taking these precautions and using the right cleaning materials will ensure that you effectively clean your thermocouple without causing any damage. Remember, safety should always be your top priority when dealing with any gas-related appliances.
Routine Maintenance Tips
Cleaning a thermocouple is essential for routine maintenance. This article provides easy-to-follow tips on how to effectively clean a thermocouple, ensuring optimal performance and longevity of your device.
Keeping your thermocouple clean is essential for ensuring the smooth operation of your gas appliance. Routine maintenance not only extends the lifespan of your thermocouple but also improves the overall efficiency and safety of your appliance. Here are some tips to help you clean your thermocouple effectively and keep your gas appliance in good condition:
How Often Should You Clean Your Thermocouple?
It is recommended to clean your thermocouple at least once every six months. However, if you notice any signs of dirt or corrosion, it is advisable to clean it more frequently. Regular cleaning helps prevent debris buildup, which can hinder the proper functioning of your gas appliance.
Other Maintenance Tasks To Keep Your Gas Appliance In Good Condition:
To maintain your gas appliance in top shape, there are a few other maintenance tasks you should perform regularly. These tasks include:
- Inspecting the burner: Check the burner for any signs of dirt, rust, or debris. Clean the burner thoroughly to ensure optimal performance.
- Cleaning the pilot assembly: The pilot assembly can accumulate dust or soot over time, affecting its efficiency. Safely turn off the gas supply and clean the pilot assembly using a soft brush or compressed air.
- Checking gas connections: Make sure all gas connections are tight and leak-free. Worn-out or damaged connections can lead to gas leaks, posing a serious safety hazard.
- Examining the gas regulator: Inspect the gas regulator for any signs of damage or wear. If you notice any issues, contact a professional technician to repair or replace it.
- Testing carbon monoxide detectors: Carbon monoxide is a silent killer, so it’s important to regularly test your carbon monoxide detectors. Replace batteries as needed and ensure the detectors are properly functioning.
Following these routine maintenance tips will not only keep your thermocouple clean, but also help maintain the overall performance and safety of your gas appliance. Remember to refer to your appliance’s manufacturer guidelines for specific maintenance recommendations.
By implementing these simple maintenance practices, you can ensure that your gas appliance operates smoothly and efficiently, providing you with a safe and comfortable environment. Regular cleaning and maintenance will go a long way in preventing any potential issues and maximizing the lifespan of your thermocouple.
Final Words
To clean a thermocouple effectively, follow these simple steps for optimal results. Start by turning off the gas supply and removing any debris from the sensor. Then, use a fine sandpaper or emery cloth to gently clean the thermocouple’s surface.
Finally, reattach the thermocouple and restore the gas supply for a fully functional and efficient appliance.
Importance Of Regular Thermocouple Cleaning For Optimal Appliance Performance
The performance of your appliances can be significantly improved by regularly cleaning the thermocouple. Here’s why it’s important:
- Cleaner thermocouples ensure proper heat transfer, allowing appliances to reach and maintain the desired temperature more efficiently.
- Regular cleaning prevents the collection of dirt, debris, and other contaminants that can interfere with the thermocouple’s functionality.
- A clean thermocouple reduces the risk of malfunction or failure, ensuring your appliances function reliably and safely.
- By cleaning the thermocouple regularly, you can extend its lifespan and avoid costly repairs or replacements.
Taking Action And Cleaning Your Thermocouples Now
Now that you understand the importance of regular thermocouple cleaning, it’s time to take action and clean your thermocouples. Here’s what you need to do:
- Begin by turning off the gas supply to your appliance and allowing it to cool down completely.
- Locate the thermocouple, which is typically positioned near the pilot light or flame sensor.
- Gently remove the thermocouple from its housing and inspect it for any buildup of dirt, soot, or corrosion.
- Use a soft cloth or brush to gently clean the thermocouple, ensuring all surfaces are free from debris.
- If necessary, use a mild detergent or cleaning solution to remove stubborn dirt or grime, ensuring thorough rinsing afterward.
- Once cleaned, carefully reinsert the thermocouple into its housing, making sure it is properly aligned.
- Turn on the gas supply, relight the pilot light (if applicable), and test the appliance to ensure optimal performance.
By taking the time to clean your thermocouples regularly, you can maintain the efficiency and reliability of your appliances. Make it a part of your routine maintenance to enjoy the many benefits of clean thermocouples.
Remember, a clean thermocouple leads to better performance and can help extend the lifespan of your appliances. Don’t wait – clean your thermocouples now!
Frequently Asked Questions On How To Clean A Thermocouple?
How Do I Know If My Thermocouple Is Dirty?
A dirty thermocouple can cause issues with your gas appliance. You can check for dirt by visually inspecting the thermocouple. Look for any debris or buildup around the sensor. If the thermocouple appears dirty or covered in residue, it may need cleaning.
To clean the thermocouple, turn off the gas supply and disconnect it from the gas valve. Gently clean the sensor with a soft brush or cloth, being careful not to damage it. Once the thermocouple is clean, reattach it and turn on the gas supply.
A clean thermocouple should improve the performance of your gas appliance. If you continue to experience problems, such as the pilot light going out or the gas shutting off, it may be necessary to replace the thermocouple. Consult a professional if you are unsure or uncomfortable performing this task yourself.
How Do You Fix A Dirty Thermocouple?
To fix a dirty thermocouple, follow these simple steps. Firstly, locate the thermocouple on your appliance. Next, turn off the gas supply and allow the thermocouple to cool down. Then, gently remove the thermocouple from its position, taking care not to damage it.
Use a soft brush or cloth to clean any dirt or debris from the thermocouple’s tip. Once cleaned, reinsert the thermocouple back into its original position. Ensure it is secure and make sure not to overtighten it. Finally, turn the gas supply back on, relight the pilot light, and check if the thermocouple is working properly.
If the problem persists, it may be necessary to replace the thermocouple altogether. Remember, regular maintenance can help avoid future issues.
How Do You Clean A Thermocouple On A Water Heater?
To clean a thermocouple on a water heater, follow these steps: 1. Turn off the heater’s power and gas supply. 2. Locate the thermocouple, usually near the burner assembly. 3. Gently remove any dirt or debris by wiping it with a clean cloth.
4. Use fine-grit sandpaper and rub the thermocouple’s tip to remove any stubborn dirt or corrosion. 5. Once clean, reinsert the thermocouple back into its position. Make sure it is secured tightly. 6. Turn on the gas supply and power back on.
7. Finally, relight the pilot light following the manufacturer’s instructions. Regular cleaning of the thermocouple ensures optimal performance and prolongs the lifespan of your water heater.
What Happens If A Thermocouple Is Dirty?
A dirty thermocouple can cause issues with the proper functioning of a device. Dirt or debris on the thermocouple can interfere with its ability to sense temperature accurately. This can result in inaccurate temperature readings or the device not working at all.
Regular cleaning of the thermocouple is necessary to ensure its optimal performance.
Conclusion
Keeping your thermocouple clean is essential for the smooth functioning of your heating system. Regular maintenance and cleaning can significantly extend the lifespan of your thermocouple. Firstly, ensure to turn off the gas supply before attempting to clean the thermocouple.
Gently remove any dust or debris using a soft brush or cloth. Carefully inspect the thermocouple for any signs of corrosion or damage. If necessary, use a fine-grit sandpaper to remove corrosion gently. Once cleaned, reconnect the thermocouple and ensure it is properly secured.
Remember to test the heating system to ensure everything is functioning correctly. By following these simple steps, you can keep your thermocouple in good condition and ensure efficient heating for a longer period. Don’t forget that regular maintenance will not only save you money on repairs but also provide you with a reliable heating system when you need it the most.
So, make cleaning your thermocouple a routine task and enjoy the warmth and comfort it provides.