Last Updated on October 19, 2025
To clean a Litter Robot, start by unplugging the unit and removing the waste drawer. Empty the waste drawer and wash it with warm soapy water.
Wipe down the interior of the unit with a damp cloth and dry it thoroughly. Clean the globe and the inside of the globe with a mild detergent and warm water. Rinse it well and dry it completely before reassembling the Litter Robot.
Make sure to clean the sensor with a soft, dry cloth and avoid using any liquids on it. Plug the unit back in and it’s ready to use.
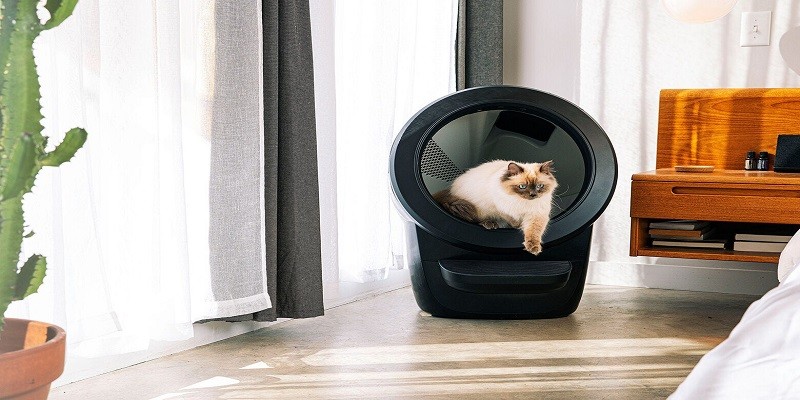
The Key Components Of A Litter Robot
Understanding the key components of a Litter Robot is essential for knowing how to clean it effectively. By familiarizing yourself with the different parts and their functions, you can ensure a thorough and efficient cleaning process for your Litter Robot.
Cleaning your Litter Robot regularly is essential to maintain its functionality and keep your cat’s litter area clean. To effectively clean your Litter Robot, it’s important to understand its key components and how to properly maintain them.
Exploring The Interior Components:
- Globe: This rounded, globe-shaped part of the Litter Robot is where your cat enters to do their business.
- Litter Bed: The Litter Bed is the platform inside the Globe where your cat stands and does their business. It’s important to keep it clean to ensure a comfortable and hygienic experience for your cat.
- Entryway: The Entryway is the opening through which your cat enters and exits the Litter Robot. Regular cleaning of this area ensures smooth operation and prevents any obstructions from blocking your cat’s access.
Familiarizing Yourself With The Waste Drawer:
- Waste Drawer: The Waste Drawer is where the litter waste is accumulated. It’s located at the bottom of the Litter Robot and should be regularly emptied and cleaned to prevent odor buildup and maintain a clean litter area.
- Drawer Full Indicator: The Drawer Full Indicator is a feature that notifies you when the waste drawer is full and needs to be emptied. Pay attention to this indicator to ensure timely cleaning.
Noticing Any External Parts That Require Cleaning:
- Button Control Panel: The Button Control Panel is where you control the Litter Robot’s operation. It’s important to clean this area regularly to prevent any debris or dust from affecting the buttons.
- Exterior Surfaces: The exterior surfaces of the Litter Robot, including the Globe and Base, should be wiped down regularly to remove any dust or dirt buildup.
Remember that maintaining a clean Litter Robot not only benefits your cat’s hygiene but also prolongs the lifespan and performance of the device. By regularly cleaning the key components, you can ensure that your Litter Robot provides a sanitary and pleasant experience for both you and your feline friend.
Cleaning The Waste Drawer And Collection Area
To clean a Litter Robot, ensure to clean the waste drawer and collection area regularly. Keeping these areas clean will maintain the functionality and hygiene of your litter box.
Step-By-Step Instructions For Removing And Emptying The Waste Drawer:
- First, unplug the litter robot from the power source and turn off the unit before starting the cleaning process.
- Open the waste drawer by pulling the handle located at the front of the unit.
- Lift the waste drawer and carefully remove it from the litter robot.
- Take the waste drawer to a suitable disposal area, preferably outdoors, to avoid any unwanted odors indoors.
- Empty the waste into a trash bag or garbage can. Make sure to properly seal the bag to prevent any leakage.
- If required, wipe the waste drawer with a mild detergent solution and a cloth to remove any lingering odor or stains.
- Rinse the waste drawer thoroughly with water to ensure it is clean.
- Allow the waste drawer to air dry completely before placing it back in the litter robot.
- Slide the waste drawer back into the unit until it clicks securely into place.
- Finally, plug the litter robot back into the power source and turn it on.
Proper Disposal Of Cat Waste:
- It is crucial to dispose of cat waste properly to ensure the health and safety of both humans and the environment.
- Never flush cat waste down the toilet as it can lead to water pollution and damage to the plumbing system.
- The most suitable method for disposing of cat waste is to seal it in a plastic bag and place it in the regular trash.
- Alternatively, there are specific pet waste disposal systems available that provide a more eco-friendly solution by facilitating the breakdown of waste.
- Check your local regulations regarding pet waste disposal to ensure compliance with any specific guidelines in your area.
- Remember to wash your hands thoroughly after handling cat waste to prevent the spread of bacteria or parasites.
Cleaning And Sanitizing The Collection Area:
- Regularly cleaning and sanitizing the collection area of your litter robot is essential to maintain a hygienic environment for your cat.
- Start by unplugging the unit and turning it off to ensure safety.
- Remove the globe from the base of the litter robot and set it aside.
- Using a mild detergent solution or pet-safe cleaner, wipe down the collection area and any visible dirt or residue.
- Pay close attention to any corners or crevices where waste may accumulate.
- Rinse the collection area with clean water to remove any cleaning product residue.
- Dry the collection area thoroughly with a clean cloth to prevent moisture buildup.
- As an extra precaution, you can spray a pet-safe disinfectant on the collection area to further eliminate any lingering germs or odors.
- Once the collection area is completely dry and sanitized, reassemble the litter robot by placing the globe back onto the base.
- Plug the unit back in, and your litter robot is ready for use.
Remember, maintaining a clean litter robot not only ensures your cat’s health and comfort but also extends the longevity of the unit itself. By following these steps for removing and emptying the waste drawer, properly disposing of cat waste, and cleaning and sanitizing the collection area, you will keep your litter robot functioning efficiently and create a pleasant litter box experience for both you and your furry friend.
Maintaining And Cleaning The Exterior Of The Litter Robot
To keep your Litter Robot clean and functioning at its best, regular maintenance is essential. This involves emptying the waste drawer, wiping down the exterior with a mild cleaner, and removing any debris from the sensors or entryway. By following these simple steps, you can ensure a fresh and hygienic environment for your cat.
Cleaning the exterior of your Litter Robot is an important part of keeping it in top condition. Regular maintenance helps to prevent build-up of dirt, grime, and odors, ensuring that your automatic litter box continues to work efficiently and effectively.
In this section, we will discuss the key steps to maintaining and cleaning the exterior of your Litter Robot.
Choosing The Right Cleaning Products And Tools:
To effectively clean the exterior of your Litter Robot, it’s important to have the right cleaning products and tools on hand. Here are some recommendations:
- Mild detergent or pet-safe cleaning solution to prevent any damage to the surface.
- Soft microfiber cloth or sponge to avoid scratching the exterior.
- Toothbrush or small brush to reach into crevices and corners.
- Warm water for diluting the cleaning solution and rinsing the surfaces.
Wiping Down The Exterior Surfaces:
To keep your Litter Robot looking clean and presentable, regular wiping down of the exterior surfaces is necessary. Follow these steps:
- Mix a small amount of mild detergent or pet-safe cleaning solution with warm water.
- Dip a soft microfiber cloth or sponge into the solution and wring out any excess moisture.
- Gently wipe down the exterior surfaces of the Litter Robot, including the base, lid, and control panel.
- Pay extra attention to any areas that may have accumulated dirt or grime.
- Rinse the cloth or sponge with clean water and wipe away any soapy residue.
- Let the Litter Robot air dry completely before using it again.
Addressing Any Stubborn Stains Or Odors:
If you notice stubborn stains or odors on the exterior of your Litter Robot, some additional steps may be necessary. Here’s how to handle them:
- Prepare a mixture of warm water and mild detergent or pet-safe cleaning solution.
- Dampen a soft microfiber cloth or sponge in the solution and wring out any excess.
- Gently scrub the stained or smelly areas, applying light pressure as needed.
- For tougher stains or odors, use a toothbrush or small brush to reach into crevices and corners.
- Rinse the cloth or sponge with clean water and wipe away any soapy residue.
- Allow the Litter Robot to air dry completely before using it again.
Regularly cleaning and maintaining the exterior of your Litter Robot will not only enhance its appearance but also contribute to a hygienic litter box environment for your furry friend. By choosing the right cleaning products and tools, wiping down the surfaces, and addressing any stubborn stains or odors, you can ensure your Litter Robot remains in optimal condition.
Regular Cleaning Schedule And Routine
Regular cleaning schedule and routine are crucial for maintaining a clean and odor-free Litter Robot. Follow these easy steps to ensure effective cleaning: remove and dispose of waste, clean the waste drawer, wipe down the interior and exterior, and sanitize the globe.
Repeat this routine regularly to keep your Litter Robot in top condition.
Owning a Litter Robot can make maintaining your cat’s litter box a breeze. However, to ensure optimal cleanliness and keep your feline friend happy, it’s important to establish a regular cleaning schedule and routine. By investing a little time and effort into creating a structured cleaning plan, you can ensure that your Litter Robot remains in top shape for your cat.
Here’s a guide on how to set up a cleaning schedule based on your cat’s needs and establish a consistent routine.
Setting A Cleaning Schedule Based On Your Cat’S Needs
Keeping your cat’s litter box clean is essential for their health and hygiene. Cats are naturally clean animals, and having a clean litter box is vital for their comfort and well-being. Here are some key points to consider when setting a cleaning schedule for your Litter Robot:
- Observe your cat’s litter box habits: Pay attention to how often your cat uses the litter box and note any specific times of the day. This will help you determine how frequently the Litter Robot needs cleaning.
- Keep track of the litter box usage: Monitor the amount of waste generated by your cat. If you have multiple cats, take into account their combined waste output. This will give you an idea of how quickly the Litter Robot fills up and requires cleaning.
- Consider the type of litter: Some types of litter may form clumps faster than others, requiring more frequent cleaning. Take note of the litter you use and read the manufacturer’s recommendations for optimal maintenance.
- Assess your cat’s preferences: Some cats are more particular about cleanliness than others. If you notice your cat becoming reluctant to use a dirty litter box, it may be an indication that you need to adjust your cleaning schedule.
- Consult with your vet: If you’re unsure about the right cleaning frequency or have concerns about your cat’s litter box habits, reach out to your veterinarian for guidance. They can offer valuable advice tailored to your cat’s specific needs.
Remember that each cat is unique, so it’s important to adapt your cleaning schedule to suit your individual feline companion’s requirements.
Establishing A Routine For Cleaning The Litter Robot
Once you have determined the ideal cleaning frequency for your Litter Robot based on your cat’s needs, it’s time to establish a routine. Having a consistent cleaning schedule will help ensure that your Litter Robot remains hygienic and functioning optimally.
Here are some tips for establishing a routine:
- Set specific cleaning days: Choose designated days or times of the week to clean the Litter Robot. This will help you stay on track and prevent any lapses in maintenance.
- Make it a habit: Incorporate cleaning the Litter Robot into your daily or weekly routine. By doing so, it becomes a regular task rather than an occasional chore, making it easier to keep up with.
- Create reminders: Use alarms or calendar notifications to remind yourself of cleaning days or times. This can be especially helpful if you have a busy schedule and may forget to perform regular maintenance.
- Involve other household members: If you share responsibilities with other family members or roommates, make sure everyone is aware of the cleaning routine and actively participates. This ensures that the cleaning duties are evenly distributed and consistently carried out.
- Keep cleaning supplies handy: Store cleaning supplies, such as spare litter, disposal bags, and cleaning solutions, in a convenient location near the Litter Robot. This way, you’ll always have everything you need readily available when it’s time for maintenance.
Staying Consistent For Optimal Cleanliness
Consistency is the key to maintaining a clean and odor-free Litter Robot. By setting a cleaning schedule based on your cat’s needs and establishing a routine, you can ensure that your Litter Robot functions efficiently and provides your furry friend with a clean and comfortable environment.
Remember, a well-maintained Litter Robot is essential for your cat’s health and happiness, so make cleaning a priority in your household.
Addressing Clogs And Blockages
If you’re wondering how to clean a litter robot and tackle clogs and blockages, follow these simple steps for a hassle-free solution. Keep your litter robot clean and functional with these easy-to-follow instructions.
Having a clean and functioning Litter Robot is essential for maintaining a tidy and odor-free litter box area for your feline friend. Unfortunately, clogs and blockages can occur, disrupting the smooth operation of the device. In this section, we’ll share some tips on how to identify signs of clogs or blockages, as well as guide you through the process of clearing the waste chute and ventilation areas.
Additionally, we’ll address some common issues you may encounter with the Litter Robot and provide troubleshooting solutions.
Identifying Signs Of Clogs Or Blockages:
- Litter not being properly sifted: If you notice that the litter isn’t being sifted as usual, or if clumps of waste are not making their way into the waste drawer, it could indicate a potential clog or blockage.
- Abnormal noise or vibration: Unusual noises or excessive vibration during the cycling process may be a sign that something is obstructing the movement of the Litter Robot.
- Litter overflows or spills: If you consistently find litter overflowing the globe or spilling onto the floor, this could be due to a blockage preventing proper waste disposal.
Clearing The Waste Chute And Ventilation Areas:
When it comes to addressing clogs or blockages in your Litter Robot, a few simple steps can help alleviate the issue:
- Power off and unplug the Litter Robot.
- Remove the waste drawer and empty it, ensuring there are no obstructions or clumps of litter impeding the waste flow.
- Use a clean, damp cloth to wipe away any built-up waste or debris on the interior surfaces, including the waste chute and ventilation areas.
- Inspect the waste chute for any blockages. Clear any obstructions carefully, using a disposable glove or a small tool like a plastic spoon or scoop.
- Check the ventilation area, located at the back of the unit, for any blockages. Remove any accumulated litter or debris that could be hindering the proper airflow.
- Once everything is clear, reassemble the Litter Robot and power it back on.
Troubleshooting Common Issues With The Litter Robot:
If you’re experiencing problems with your Litter Robot, here are a few troubleshooting tips to consider:
- Ensure the unit is placed on a flat and stable surface to prevent any imbalance or movement during operation.
- Regularly clean the litter box and replace the litter as needed to prevent excessive waste accumulation.
- Check the power source and ensure the cord is securely plugged in.
- Make sure that the waste drawer is properly inserted and aligned with the unit.
- For any persistent issues, consult the Litter Robot’s user manual or contact their customer support for further assistance.
Remember, maintaining a clean Litter Robot is key to its optimal performance. By regularly addressing any clogs, blockages, or issues that arise, you can ensure that your furry friend has a fresh and hassle-free litter box experience.
Credit: www.reddit.com
Proper Maintenance And Upkeep
Maintaining and cleaning a litter robot is essential for its optimal functioning. Regular cleaning and upkeep ensure a clean and hygienic environment for your furry friend. Following the manufacturer’s instructions and using appropriate cleaning agents will help prolong the life of your litter robot and keep it odor-free.
Keeping Track Of Necessary Maintenance Tasks
- Regularly check the waste drawer: Ensure that the waste drawer is not overflowing and promptly empty it when needed.
- Clean the unit’s exterior: Wipe down the exterior of the Litter Robot with a damp cloth to remove any dirt or dust buildup.
- Check the sensor window: Inspect the sensor window located inside the globe to make sure it is clean and free from any obstructions.
- Monitor the waste sensor: Keep an eye on the waste sensor and clean it gently if it becomes dirty or clogged.
- Clean the globe and base: Periodically wash the globe and base with mild soap and water to maintain cleanliness and prevent odor buildup.
Lubricating Moving Parts For Smooth Operation
- Lubricate the motor: Apply a small amount of lubricant to the motor shaft every few months to ensure smooth rotation.
- Grease the gear tracks: Lubricate the gear tracks with a silicone-based grease to prevent friction and enable smooth movement.
- Maintain the rubber seal: Regularly clean and lubricate the rubber seal to maintain an airtight connection between the globe and base.
Replacing Worn-Out Components As Needed
- Check and replace the litter liner: Inspect the condition of the litter liner and replace it if it becomes torn or damaged.
- Replace the carbon filter: Replace the carbon filter every three to six months to maintain optimal odor control.
- Switch out the waste drawer liner: Replace the waste drawer liner as necessary to keep the Litter Robot clean and hygienic.
- Replace worn-out components promptly: If any other parts, such as the motor or sensor, show signs of wear or malfunction, replace them promptly to ensure optimal performance.
Regular maintenance and proper upkeep are crucial for the smooth operation of your Litter Robot. By keeping track of necessary tasks, lubricating moving parts, and replacing worn-out components as needed, you can ensure that your Litter Robot remains clean and functional for your feline companion.
Using Litter And Litter Liners To Simplify Cleaning
Simplify the task of cleaning your litter robot by using litter and litter liners. These convenient tools make the cleaning process easier and more efficient, ensuring a hygienic environment for your feline friend.
Maintaining a clean litter box is essential for the well-being of both you and your feline friend. Thankfully, there are a few tricks you can employ to make this chore easier and more efficient. In this section, we will explore three strategies to simplify the cleaning process: choosing the right litter type, utilizing litter liners, and maximizing cleanliness with the right litter accessories.
Choosing The Right Litter Type For Easy Maintenance
- Clumping litter: Opt for a high-quality clumping litter that forms solid clumps when it comes into contact with moisture. This type of litter makes it easier to scoop out waste and keeps your litter box cleaner for longer periods.
- Unscented litter: While scented litters may seem appealing, they can sometimes be overpowering for both you and your cat. Opt for unscented litter to avoid any potential irritations or unpleasant odors.
- Dust-free litter: Look for a litter that is specifically labeled as dust-free. Dust can cause respiratory issues and create a mess around the litter box area. By choosing a dust-free option, you can minimize mess and keep the air cleaner.
Utilizing Litter Liners For Effortless Waste Removal
- Easy installation: Litter liners, also known as disposable litter box liners, can be easily placed in the litter box before adding the litter. They are available in various sizes to fit different litter box dimensions.
- Quick cleanup: Litter liners make waste removal a breeze. Simply lift the liner, tie it securely, and dispose of it. This eliminates the need to scrub the litter box and saves you precious time and effort.
- Added protection: Litter liners help protect the litter box from urine and fecal matter, preventing any buildup or staining. This prolongs the lifespan of the litter box and reduces odor.
Maximizing Cleanliness With The Right Litter Accessories
- Litter mats: Placing a litter mat outside the litter box entrance is an effective way to trap any loose litter particles. These mats have textured surfaces that capture litter stuck to your cat’s paws, minimizing tracking and mess around the house.
- Litter scoops: Invest in a sturdy, ergonomic litter scoop that makes scooping waste a breeze. Look for one with closely spaced slots or holes to effectively sift through the litter and separate waste from clean litter.
- Litter deodorizers: If you’re looking to further reduce odors, consider using litter deodorizers. These products are specifically formulated to neutralize unpleasant smells, keeping your home smelling fresh and clean.
By choosing the right litter type, utilizing litter liners, and incorporating practical litter accessories, you can simplify the cleaning process and ensure a clean and hygienic litter box for your furry companion. With these strategies in place, maintaining a fresh litter box will no longer feel like a daunting task.
Training Your Cat For A Cleaner Litter Robot
Train your cat to keep the litter robot clean with these easy steps. Maintain a fresh and odor-free cat litter box by following our simple guide.
Introducing your cat to the litter robot:
- Gradually introduce the litter robot to your cat by letting them explore it at their own pace.
- Place the litter robot in a quiet and accessible area, away from their food and water bowls.
- Allow your cat to sniff and investigate the litter robot without any pressure.
- Praise and reward your cat with treats or affection when they show interest or curiosity towards the litter robot.
Encouraging good litter box habits:
- Ensure that the litter robot is filled with clean litter that is comfortable for your cat to use.
- Scoop out any waste from the litter robot regularly to maintain cleanliness.
- Monitor your cat’s litter box usage and redirect them to the litter robot when necessary.
- Provide positive reinforcement such as treats or praise whenever your cat successfully uses the litter robot.
Addressing any behavioral issues related to cleanliness:
- If your cat refuses to use the litter robot, try placing some of their waste into the litter robot to familiarize them with the scent.
- Clean any accidents outside the litter robot with enzyme-based cleaners to prevent lingering odors.
- Consult with a veterinarian or animal behaviorist if your cat continues to avoid using the litter robot or exhibits unusual behavior.
Remember, consistency and patience are key when training your cat. With time and positive reinforcement, your furry friend will adapt to the litter robot and maintain good litter box habits for a cleaner and more convenient experience.
Troubleshooting Common Cleaning Challenges
Learn how to troubleshoot common cleaning challenges with your Litter Robot, ensuring a clean and hygienic environment for your furry friend. Discover the best techniques and tips for cleaning your Litter Robot effectively.
When it comes to cleaning a Litter Robot, there can be a few common challenges that may arise. Here, we will discuss some troubleshooting tips to help you handle excessive waste accumulation, deal with persistent odors, and seek professional assistance when needed.
Handling Excessive Waste Accumulation
- Check the waste drawer: Begin by ensuring that the waste drawer is properly aligned and securely in place. Sometimes, a misalignment can prevent the waste from being properly collected, resulting in a buildup.
- Adjust litter level: Take a look at the litter level within the Litter Robot. If the litter is too high or too low, it can cause waste accumulation issues. Make sure to follow the manufacturer’s guidelines regarding the recommended litter level.
- Empty waste drawer regularly: It’s essential to regularly empty the waste drawer to prevent waste from piling up. Aim to empty it at least once a week or more frequently if you have multiple cats using the Litter Robot.
Dealing With Persistent Odors
- Use odor control products: Consider using odor control products like specialized litter or deodorizing agents designed for use with automatic litter boxes. These products can help neutralize unpleasant odors.
- Clean the Litter Robot thoroughly: Regularly clean the Litter Robot itself to eliminate any trapped waste or lingering odors. Refer to the manufacturer’s instructions for proper cleaning techniques.
- Ventilate the area: Ensure proper ventilation in the room where the Litter Robot is placed. Adequate airflow can help reduce odors and keep the environment fresh.
Seeking Professional Assistance When Needed
- Contact customer support: If you are experiencing persistent issues with your Litter Robot, don’t hesitate to contact the manufacturer’s customer support. They will be able to provide specific troubleshooting advice and guidance.
- Consider professional maintenance: If the problems persist or you’re unsure about handling the issues on your own, you may want to consider reaching out to a professional service that specializes in the maintenance and repair of Litter Robot or automatic litter boxes. They can provide expert assistance and ensure optimal functioning.
Remember, proper cleaning and maintenance are crucial for the efficient operation of your Litter Robot. By following these troubleshooting tips and seeking assistance when needed, you can keep your automatic litter box in top condition and provide a clean and odor-free environment for your feline friends.
Frequently Asked Questions On How To Clean A Litter Robot?
What Do I Clean My Litter-Robot With?
Clean your Litter-Robot with mild soap and water.
What Is The Best Way To Clean A Litter-Robot 3?
To clean a Litter-Robot 3, remove the waste drawer, empty it, wipe it clean, and refill with fresh litter.
How Often Should I Clean My Litter-Robot?
Clean your Litter-Robot regularly to maintain a hygienic environment for your cat and ensure optimal performance.
How Do You Clean A Stinky Litter-Robot?
To clean a stinky Litter-Robot, remove the waste drawer, empty it, and wash it with soapy water.
How Often Should A Litter Robot Be Cleaned?
To maintain cleanliness and prevent odor, it is recommended to clean your litter robot at least once a week.
Conclusion
Keeping your litter robot clean is essential for maintaining a healthy and odor-free environment for your furry friend. By following the step-by-step process outlined in this blog post, you can ensure that your litter robot remains in good working condition and provides a comfortable space for your cat to do their business.
Regular maintenance, such as emptying the waste drawer, cleaning the globe and base, and replacing the waste bag, will not only extend the lifespan of your litter robot but also enhance its performance. Additionally, using high-quality litter and conducting routine inspections will help prevent any potential issues from arising.
Remember, a clean litter robot means a happy cat and a happy cat owner. So, make cleaning your litter robot a part of your regular routine to create a clean and sanitary environment for your pet.