Last Updated on August 7, 2025
To clean a roomba, remove the dustbin and filter, empty the contents, and clean both parts with warm water and mild soap. Additionally, use a brush or cloth to remove debris from the sensors and brushes.

Credit: www.bestcordlessvacuumguide.com
Importance Of Regular Cleaning
Regular cleaning of your roomba is essential to maintain its performance. Learn how to effectively clean your roomba to ensure it functions optimally and has a longer lifespan.
Why Cleaning Your Roomba Is Essential:
Regular cleaning of your roomba is crucial to ensure optimal performance and longevity. Neglecting to clean your robotic vacuum not only affects its efficiency, but it can also lead to several issues such as clogged brushes, reduced suction power, and even malfunctions.
To keep your roomba running smoothly and effectively, prioritize its cleaning needs. Here’s why:
- Eliminates dirt and debris buildup: Daily use of your roomba results in the accumulation of dirt, dust, and hair in its various parts. Regular cleaning prevents the buildup of these particles, ensuring that your roomba operates at its best.
- Maintains suction power: When your roomba’s filter and brushes are clogged with dirt and debris, its suction power is significantly reduced. Regular cleaning prevents blockages, allowing your roomba to maintain optimal suction and pick up dirt efficiently.
- Prevents tangled brushes: Over time, the brushes on your roomba can become entangled with hair, strings, and other debris, hindering their rotation. Cleaning your roomba regularly prevents brush tangles and keeps it operating smoothly.
- Promotes proper functioning of sensors: Dust and dirt can accumulate on the sensors of your roomba, impairing its ability to detect obstacles and navigate effectively. By cleaning its sensors regularly, you ensure accurate mapping and avoid collisions.
- Enhances battery life: A clean roomba consumes less power, allowing its battery to last longer. Regular cleaning ensures that the battery doesn’t drain quickly, extending the cleaning time and reducing the need for frequent recharging.
Benefits Of Regular Maintenance:
Regular maintenance is essential to maximize the lifespan of your roomba. By investing a little time in maintaining your robotic vacuum, you can reap the following benefits:
- Prolongs roomba’s lifespan: Just like any other appliance, regular maintenance ensures that your roomba continues to function optimally for an extended period. A well-maintained roomba is less likely to break down or require costly repairs.
- Saves money on repairs: Regular cleaning and maintenance help avoid potential issues that may arise due to neglect. By preventing malfunctions and addressing minor problems early on, you can avoid expensive repairs or the need for a replacement.
- Improves cleaning efficiency: A clean roomba is a more effective cleaner. Regular maintenance ensures that each part of your roomba operates as intended, resulting in better cleaning performance and cleaner floors.
- Reduces allergens in your home: Dust, pet hair, and other allergens tend to accumulate in your roomba. Regular cleaning prevents these particles from spreading back into your home, providing a cleaner environment for those with allergies or sensitivities.
- Keeps your floors looking pristine: A well-maintained roomba with clean brushes and filters ensures that your floors are consistently cleaned to perfection. By regularly maintaining your roomba, you can enjoy spotless floors without much effort.
Maintaining your roomba shouldn’t be overlooked if you want it to function at its best for years to come. By adhering to a regular cleaning routine, you can enhance its performance, increase its lifespan, and enjoy spotless floors effortlessly.
Preparing For Cleaning
To clean a roomba effectively, prepping is key. Remove the dustbin, clean the filter, and brush the bristles before starting the cleaning process. Make sure your roomba is ready to keep your floors sparkling.
Roombas are a fantastic addition to any home, making cleaning a breeze. However, to ensure the best performance from your roomba, it’s important to keep it clean and well-maintained. In this section, we will delve into the necessary steps for preparing your roomba for cleaning.
Let’s get started!
Gathering Necessary Tools And Supplies:
- Soft-bristle brush: This will help in removing any stubborn dirt or debris from the roomba’s surface.
- Clean, lint-free cloth: Useful for wiping down the roomba and its components.
- Mild soap or detergent: Dilute a small amount in water to clean the various parts of the roomba.
- Compressed air canister: Great for blowing away dirt and dust from hard-to-reach areas.
- Replacement filters (if necessary): It’s essential to have spare filters on hand for regular maintenance.
Removing The Dustbin And Filter:
- Begin by locating the dustbin release latch on the roomba. It’s usually located at the back or top of the device.
- Use your fingers to press the latch, unlocking the dustbin compartment.
- Gently pull out the dustbin from the roomba, being mindful not to spill its contents.
- Empty the dustbin contents into a trash bag or waste bin.
- With the dustbin removed, access the filter compartment, typically found near the dustbin area.
- Depending on the roomba model, the filter may slide out or be secured in place with additional latches or screws.
- Carefully remove the filter and place it aside for cleaning or replacement.
Inspecting For Any Visible Damage:
- Examine the roomba’s exterior for any signs of cracks, scratches, or wear and tear.
- Check the wheels for debris stuck in them, ensuring they are clear and moving freely.
- Inspect the brushroll for any entangled hair or threads, removing them to prevent damage.
- Pay attention to the sensors and buttons, ensuring they are clean and functioning properly.
- If you notice any visible damage or issues, it’s best to consult the roomba’s user manual or contact customer support for further assistance.
Taking the time to properly prepare your roomba for cleaning will not only improve its performance but also extend its lifespan. So, gather your tools and supplies, remove the dustbin and filter, and inspect for any visible damage before embarking on the cleaning process.
In the next section, we will delve into the step-by-step guide for cleaning your roomba thoroughly. Stay tuned!
Cleaning The Dustbin And Filter
To clean a roomba, start by emptying and cleaning the dustbin and filter. Remove any dirt and debris, rinse with water, and allow them to dry completely before reassembling.
Keeping your roomba’s dustbin and filter clean is essential for its optimal performance. Regularly emptying the dustbin and cleaning the filter will ensure that your roomba continues to efficiently pick up dirt and debris. Here’s how you can clean the dustbin and filter effectively:
Emptying The Dustbin Properly:
- Carefully remove the dustbin from your roomba by pressing the release button.
- Take the dustbin to a trash can and hold it over the bin with the opening facing downwards.
- Release the bin latch and gently shake the dustbin to empty its contents into the trash.
- To ensure complete removal of dirt and debris, tap the side of the dustbin or use a soft brush to dislodge any remaining particles.
- Once the dustbin is empty, close the latch securely before reattaching it back to your roomba.
Cleaning The Filter Effectively:
- Locate the filter compartment on your roomba, usually situated near the dustbin.
- Open the compartment by pulling the tab or pressing the release button.
- Remove the filter from the compartment and gently tap it against a hard surface to dislodge loose dirt and debris.
- For a more thorough cleaning, rinse the filter with water. Make sure to follow the manufacturer’s instructions on whether the filter is washable or not.
- Allow the filter to dry completely before placing it back into the filter compartment.
- Ensure the filter is securely installed and close the compartment tightly.
Tips For Removing Stubborn Dirt And Debris:
- If you encounter stubborn dirt or debris stuck in the dustbin, use a small brush or toothbrush to loosen and remove it.
- For better access to hard-to-reach areas, consider using compressed air or a can of compressed air duster to blow away trapped debris.
- Inspect the filter for clogs or excessive build-up. If necessary, use a soft brush or toothbrush to remove any debris from the filter.
- It’s recommended to clean the dustbin and filter after each use or at least once a week, depending on the frequency of your roomba’s usage.
- Regularly maintaining and cleaning the dustbin and filter will prolong the life of your roomba and ensure its optimal performance.
Keeping your roomba’s dustbin and filter clean is an essential part of its regular maintenance. By emptying the dustbin properly, cleaning the filter effectively, and following the provided tips, you’ll ensure that your roomba continues to operate at its best, leaving your floors clean and dust-free.
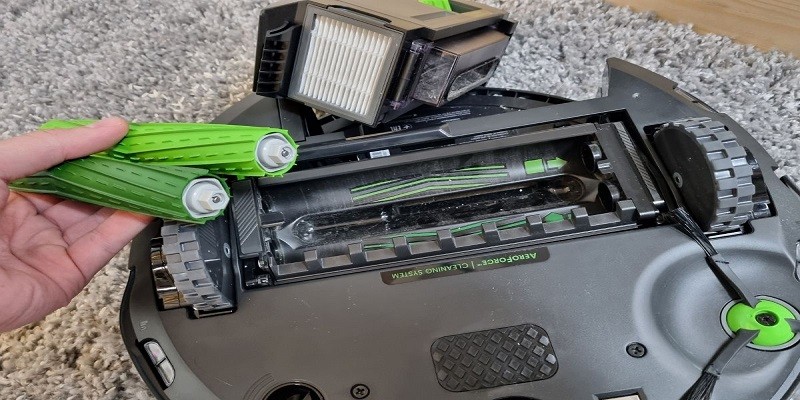
Cleaning The Brushes And Wheels
To clean your roomba effectively, make sure to pay attention to the brushes and wheels. Remove any hair or debris from the brushes and use a damp cloth to wipe down the wheels. This will ensure optimal performance and longevity for your roomba.
Keeping your roomba in good working condition requires regular maintenance, including cleaning the brushes and wheels. Over time, hair, dirt, and debris can accumulate, affecting the vacuum’s performance. Here’s a step-by-step guide on how to tackle this task efficiently:
Removing Tangled Hair From The Brushes
- Turn off your roomba and disconnect it from the charging base or power source.
- Flip the roomba over to access the brushes. You might find hair, threads, or other debris tangled around them, hindering their rotation and suction capabilities.
- Gently pull any hair or threads wrapped around the brush bristles. Use your fingers or a pair of scissors if needed, being careful not to damage the bristles.
- Take a closer look at the brush bearings, removing any entangled hair or debris that may have accumulated there.
- Ensure that all tangles are cleared before proceeding to the next step.
Cleaning The Brushes And Bristles
- Dampen a cloth or sponge with warm, soapy water. Make sure the water is merely damp and not dripping wet.
- Gently wipe the brush bristles and the brush bearings with the damp cloth, removing any dirt, dust, and remaining residue.
- If necessary, use a small brush or toothbrush to get into hard-to-reach areas and dislodge stubborn debris.
- Rinse the brush bristles and bearings thoroughly with clean water, ensuring that all the soap is removed.
- Allow the brushes to air dry completely before reattaching them to the roomba.
Clearing The Wheels Of Any Dirt Or Debris
- Examine the wheels of your roomba for any visible dirt, hair, or buildup.
- Using a small tool or a toothbrush, gently scrape off any dirt or debris adhered to the wheels.
- If necessary, dampen a cloth with warm soapy water and wipe the wheels to remove any remaining grime.
- Rinse the wheels with clean water and ensure they are completely dry before reassembling them onto the roomba.
Regularly cleaning the brushes and wheels of your roomba ensures optimal performance and extends the lifespan of your beloved robotic cleaner. By following these simple steps, you can keep your roomba running smoothly and efficiently, leaving your floors spotless without any hassle.
Maintenance And Troubleshooting Tips
Learn how to effectively clean your roomba with these helpful maintenance and troubleshooting tips. Discover step-by-step instructions to ensure your roomba stays in top condition for efficient cleaning.
Regular maintenance of your roomba will ensure that it continues to clean effectively and efficiently. In this section, we will cover important maintenance tasks and troubleshooting tips to help you keep your roomba in optimal condition.
Cleaning The Sensors:
- The sensors on your roomba help it navigate and detect obstacles. Keeping them clean is crucial for proper functioning. Here’s how to clean the sensors:
- Inspect the sensors for any dirt, dust, or debris.
- Gently wipe the sensors using a clean, dry cloth or a soft brush to remove any buildup.
- Ensure that the sensors are free from any obstructions that might hinder their performance.
Checking For Blockages In The Roomba:
- Blockages can hinder your roomba’s performance and may lead to errors or incomplete cleaning cycles. Here’s how to check for blockages:
- Turn off the roomba and remove the dustbin.
- Inspect the brushes, side wheels, and the brush chamber for any tangled hair, strings, or other debris.
- Use a pair of tweezers or a small brush to remove any blockages you find.
- Double-check the brush assembly to ensure optimum performance.
Addressing Common Problems And Error Codes:
- Roomba may encounter various issues or display error codes during operation. Here are some common problems and how to address them:
- Error 1: Roomba’s main brushes are stuck. Check for blockages and clear them. Restart the roomba if necessary.
- Error 2: Roomba’s side wheels are stuck. Clean the wheels and the wheel wells, ensuring they are free from dirt or obstruction.
- Error 5: Roomba’s cliff sensors are dirty. Wipe them clean and ensure there is no dirt or residue affecting their performance.
- Error 6: Roomba’s bumper is being obstructed. Remove any debris that might be blocking the bumper’s movement.
- If you encounter persistent errors or issues, consult the roomba user manual or contact customer support for further assistance.
Regularly cleaning your roomba and addressing any issues or errors promptly will help maintain its performance and prolong its lifespan. By following these maintenance and troubleshooting tips, you can ensure that your roomba continues to clean your home effectively and efficiently, saving you time and effort in the long run.
Frequently Asked Questions Of How To Clean A Roomba?
How Often Should I Clean My Roomba?
You should clean your roomba after every 3-5 uses to ensure optimal performance and longevity.
Can I Use Soap And Water To Clean My Roomba?
No, you should never use soap and water to clean your roomba. Instead, use a damp cloth or compressed air.
How Do I Remove Hair Stuck In My Roomba?
To remove hair stuck in your roomba, use a pair of scissors or a cleaning tool to gently cut and pull the hair out.
Can I Clean The Brushes Of My Roomba?
Yes, you can clean the brushes of your roomba by removing them from the device and using a brush or cloth to remove debris.
What Should I Do If My Roomba Is Not Cleaning Properly?
If your roomba is not cleaning properly, try cleaning the brushes, emptying the bin, and checking for any obstructions in the device.
Conclusion
Cleaning your roomba regularly is essential to ensure its optimal performance and longevity. By following these simple steps, you can easily maintain your robotic vacuum cleaner without any hassle. To begin with, make sure to remove all debris from the bin and filters.
Cleaning the brushes and wheels thoroughly is also important to prevent clogging and maintain proper suction. Additionally, don’t forget to clean the sensors and charging contacts for uninterrupted operation. Regularly checking and cleaning the side wheels and main brush is crucial for preventing tangles and maximizing cleaning efficiency.
Lastly, don’t forget to wipe down the exterior of your roomba to keep it looking clean and fresh. By incorporating these cleaning routines into your regular maintenance, you can have a spotless and efficient roomba that will continue to exceed your expectations.