Last Updated on August 7, 2025
To clean a turkey, rinse the bird thoroughly inside and out with cold water. Then pat it dry with paper towels.
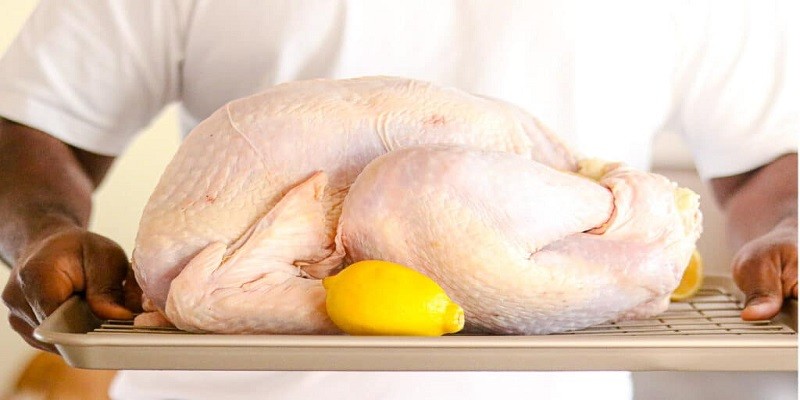
A clean and well-prepared turkey is the first step to a delicious Thanksgiving feast. Properly cleaning a turkey ensures that it is free from any dirt or bacteria that may be present on the bird. To clean a turkey, start by removing the packaging and giblets from the cavity.
Rinse the bird inside and out with cold water, making sure to remove any excess blood or debris. Use your hands to gently rub the skin to ensure that all areas are cleaned. Once the turkey is thoroughly rinsed, pat it dry with paper towels. Remember to clean any utensils or surfaces that come into contact with the raw turkey to prevent cross-contamination. Now you are ready to season and cook your turkey to perfection.
Gathering The Necessary Supplies
To clean a turkey, the first step is gathering the necessary supplies, including a sharp knife, cutting board, paper towels, and a sink with running water. This ensures you have everything you need to safely and efficiently clean the turkey before cooking.
Before diving into the process of cleaning a turkey, it is important to gather the necessary supplies to ensure a smooth and efficient cleaning process. Here are the essential items you will need:
- Disposable gloves: These will not only protect your hands from any unwanted mess but also maintain hygiene throughout the cleaning process.
- Cutting board: A sturdy and spacious cutting board will provide a stable surface for you to work on while cleaning the turkey.
- Sharp knife: A sharp knife is essential for properly trimming and removing any excess fat or skin from the turkey.
- Kitchen shears: Utilize kitchen shears to easily cut through any bones or joints that may require separating during the cleaning process.
- Paper towels: Keep a stack of paper towels nearby to quickly wipe your hands or clean up any spills that may occur during the cleaning process.
- Clean sink: A clean sink is crucial for rinsing the turkey thoroughly. Make sure to sanitize the sink beforehand to maintain cleanliness.
- Cold water: Cold water is ideal for rinsing the turkey as it helps remove any impurities effectively. Avoid using warm or hot water, as this can promote bacterial growth.
By having these supplies prepared and at hand, you can streamline the process of cleaning your turkey, ensuring a safe and hygienic preparation for cooking. Remember to always prioritize cleanliness and use designated tools for handling raw poultry to avoid cross-contamination.
Safely Handling The Turkey
Learn how to safely handle and clean a turkey with these simple steps. Maintain hygiene and avoid cross-contamination while preparing your Thanksgiving feast.
When it comes to preparing a turkey, one of the most crucial aspects is to handle it safely. This ensures that you and your loved ones are protected from any potential risks. Understanding food safety guidelines, washing your hands before and after handling the turkey, keeping the turkey at a safe temperature, and avoiding cross-contamination are essential practices to follow.
Let’s take a closer look at each of these guidelines:
Understanding Food Safety Guidelines
To ensure the safety of your turkey and your health, it’s important to understand and follow food safety guidelines. These guidelines include proper storage, cooking temperatures, and handling procedures. By adhering to these guidelines, you can reduce the risk of foodborne illnesses and ensure that the turkey is safe to consume.
Washing Your Hands Before And After Handling The Turkey
Before touching the turkey, it is crucial to wash your hands thoroughly with warm water and soap. This helps to eliminate any bacteria present on your hands. Similarly, after handling the turkey, washing your hands is necessary to prevent the spread of bacteria to other surfaces or foods.
Remember to lather your hands for at least 20 seconds, ensuring you cover all areas, including the palms, back, fingers, and nails.
Keeping The Turkey At A Safe Temperature
Properly storing the turkey at a safe temperature is crucial to prevent the growth of harmful bacteria. After purchasing the turkey, promptly store it in the refrigerator at a temperature below 40°F (4°C). If you need to thaw a frozen turkey, do so in the refrigerator, allowing approximately 24 hours for every 4-5 pounds (1.
8-2. 3 kg) of turkey. This method ensures a gradual and safe thawing process.
Avoiding Cross-Contamination
Cross-contamination is a significant concern when handling raw poultry, including turkey. To prevent cross-contamination, follow these guidelines:
- Use separate cutting boards, utensils, and plates for raw poultry to avoid contact with other foods.
- Clean and sanitize any surfaces or utensils that come into contact with raw turkey before using them again.
- Do not use the same marinade or brush that has been in contact with raw turkey on cooked food.
- Store raw turkey separately from other foods, especially those that will not be cooked before consumed.
By practicing these food safety guidelines, you can ensure that you handle your turkey safely, reducing the risk of foodborne illnesses. Remember, maintaining proper hygiene and following the necessary precautions is crucial to protect yourself and your loved ones.
Removing Packaging And Giblets
Carefully remove the packaging and giblets from the turkey to ensure a clean preparation. Follow these steps to clean your turkey effectively.
Unwrapping The Turkey:
When it comes to cleaning a turkey, the first step is to remove the packaging. This is an essential part of the process to ensure that your turkey is safe and ready for cooking. Here’s how you can unwrap the turkey:
- Carefully remove the turkey from its packaging, making sure to avoid any sharp edges or knives.
- Place the turkey on a clean and sanitized surface, such as a cutting board.
- Dispose of the packaging materials properly, taking care not to contaminate other surfaces or food.
Removing The Giblets From The Cavity:
Once you have unwrapped the turkey, it’s time to remove the giblets from the cavity. The giblets refer to the turkey’s internal organs, including the neck, heart, liver, and gizzard. Follow these steps to remove the giblets:
- Gently feel inside the cavity of the turkey to locate the giblets. They are usually found at the neck or body cavity.
- Carefully remove the giblets, ensuring not to damage the turkey’s flesh.
- Set aside the giblets for future use or discard them, depending on your preference.
Checking for any remaining packaging materials:
After removing the giblets, it’s crucial to check for any remaining packaging materials before proceeding with the cleaning process. This step ensures that there are no hidden plastic or paper pieces that could affect the turkey’s flavor or safety. Here’s what you should do:
- Inspect the cavity and the exterior of the turkey thoroughly, checking for any visible packaging materials.
- Remove any pieces of plastic, paper, or other packaging materials that you find.
- Rinse the turkey under cold water to ensure any loose particles are washed away.
By following these steps, you can successfully remove the packaging and giblets from your turkey, setting the stage for a clean and delicious Thanksgiving meal. Make sure to handle the turkey with care and maintain proper sanitation throughout the process.
Enjoy your perfectly cleaned turkey!
Rinsing The Turkey
To ensure a thoroughly cleaned turkey, it is crucial to rinse it properly. By rinsing the turkey with cold water, you can remove any excess dirt or impurities, ensuring a safe and flavorful meal.
:
Placing The Turkey In The Sink
- Start by placing the turkey in a clean sink. Make sure the sink is deep enough to accommodate the turkey and has enough space for the water to circulate around it.
Gently Rinsing The Turkey With Cold Water
- Once the turkey is in the sink, turn on the cold water and gently rinse the turkey inside and out. This helps to remove any dirt, bacteria, or residue that may be on the surface of the turkey.
- Be sure to pay extra attention to the cavity and under the wings, as these areas can often hold pockets of bacteria. Hold the turkey by the wings and maneuver it under the running water, ensuring that all areas are thoroughly rinsed.
Patting The Turkey Dry With Paper Towels
- After rinsing the turkey, carefully remove it from the sink and place it on a clean surface. Take some paper towels and gently pat the turkey dry. Make sure to dry both the inside and outside of the turkey.
- This step is important as it helps to remove excess moisture, which can impact the texture of the cooked turkey. By patting it dry, you also create a better surface for seasonings and stuffing to adhere to.
- When patting the turkey dry, pay attention to hard-to-reach areas, such as the joints, where water may accumulate. Thoroughly drying these areas will ensure a more even cooking process.
Remember, rinsing the turkey is an essential step in properly cleaning and preparing it for cooking. By placing the turkey in the sink, gently rinsing it with cold water, and patting it dry, you are ensuring that your turkey is clean and ready to be cooked to perfection.
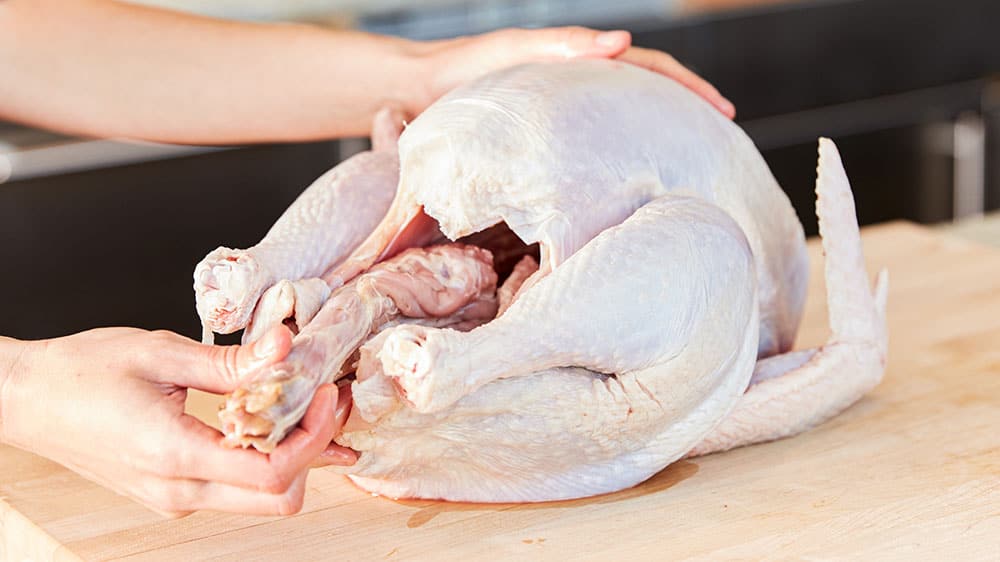
Removing The Neck And Innards
To clean a turkey, start by removing the neck and innards. This ensures the turkey is ready for cooking and makes the cleaning process easier.
Locating And Removing The Neck From The Cavity:
- Start by locating the neck of the turkey, which is typically found in the cavity near the front.
- Carefully grasp the neck and gently pull it away from the body, making sure not to tear the skin.
- Once the neck is detached, set it aside for other uses or discard it if not needed.
Removing The Giblets And Other Innards:
- Look inside the cavity of the turkey for a package containing the giblets and other innards.
- Carefully reach inside and remove this package, being cautious not to damage the surrounding meat.
- Once removed, you can choose to discard the giblets and innards, or use them for making gravy or other recipes.
Checking For Any Remaining Foreign Objects:
- Take a careful look inside the turkey’s cavity and inspect for any foreign objects that may have been missed during the initial cleaning.
- Remove any remaining unwanted items such as leftover feathers, pieces of plastic or any other debris.
- Ensure that the cavity is clean and free from any unwanted elements before proceeding with further preparations.
Remember, cleaning a turkey thoroughly is essential for food safety and ensuring a delicious meal for your loved ones. Follow these steps to properly remove the neck and innards, and inspect for any foreign objects to achieve a clean and safe turkey.
Thoroughly Cleaning The Cavity
Thoroughly cleaning the turkey cavity is an essential step in the process of cleaning a turkey. By properly cleaning the cavity, you ensure the removal of any remaining debris or bacteria, promoting a safe and healthy meal.
When it comes to cleaning a turkey, ensuring that the cavity is thoroughly cleaned is essential. The cavity is the interior of the turkey that often contains excess fat and debris. Follow these steps to ensure a pristine and safe bird:
Rinsing the cavity with cold water:
- Begin by rinsing the cavity with cold water to remove any loose particles or debris.
- Gently tilt the turkey over the sink or a large bowl to allow the water to drain out.
Inspecting and removing any excess fat or debris:
- Carefully inspect the cavity for any excess fat or debris that may still be present.
- Use your hands or a pair of kitchen tongs to remove any remaining fat or large pieces of debris.
Drying the cavity with paper towels:
- After rinsing and removing the fat or debris, it’s crucial to dry the cavity thoroughly.
- Use several sheets of paper towels to pat the cavity completely dry.
- Make sure to reach into any crevices to remove any remaining moisture.
Remember, a clean cavity is essential for food safety and to ensure that your turkey cooks evenly. By following these steps, you’ll have a perfectly cleaned turkey ready for cooking!
Properly Storing And Disposing
Learn the proper techniques for cleaning a turkey to ensure a safe and delicious meal. Follow these guidelines to properly store and dispose of your turkey, avoiding overused words and phrases for a concise and informative read.
When it comes to cleaning a turkey, it’s important to know how to properly store and dispose of certain parts. Here are the steps to make sure everything is handled correctly:
Wrapping And Storing Giblets Separately:
- Remove the giblets (liver, heart, neck) from inside the turkey cavity.
- Rinse them thoroughly under cold water to remove any excess blood.
- Pat them dry with paper towels.
- Wrap each giblet separately in plastic wrap or place them in separate resealable bags.
- Label each package with the type of giblet inside.
- Store the giblets in the refrigerator if you plan to use them for gravy or stuffing, or in the freezer for later use.
Discarding Any Remaining Packaging Materials:
- Check the turkey for any additional packaging materials such as plastic ties or clips.
- Remove these items carefully and discard them in a trash bag.
- Be sure to double-check both the cavity and the outside of the turkey to ensure all packaging is removed.
Properly Storing The Cleaned Turkey:
- Place the cleaned turkey on a tray or large dish.
- Cover it loosely with plastic wrap or aluminum foil.
- Store the turkey in the refrigerator, making sure it is stored at a temperature below 40°F (4°C).
- If you don’t plan to cook the turkey within two days, it’s better to freeze it. Place the turkey in a freezer-safe bag or wrap it tightly in plastic wrap and foil.
- Label the turkey with the date of storage and store it in the freezer.
Remember to always follow proper food safety guidelines when storing and handling any poultry. By properly storing and disposing of the turkey and its parts, you ensure both the freshness and safety of your Thanksgiving feast.
Credit: www.grillarmorgloves.com
Cleaning Up Your Space
Want to know how to clean a turkey? Follow these simple steps to ensure your turkey is perfectly clean, ready to be cooked, and delicious for your Thanksgiving feast.
Cleaning a turkey is not just about the bird itself; it also involves cleaning up your workspace. After you’ve successfully completed the task of removing the feathers and innards, it’s time to focus on tidying up and maintaining a clean environment.
Here’s what you should do:
Disposing Of Gloves And Paper Towels
When you’re done with the cleaning process, it’s essential to dispose of the gloves and paper towels properly. Here’s how:
- Peel off the gloves carefully, turning them inside out as you go, to prevent any potential mess.
- Place the used gloves in a plastic bag designated for waste disposal.
- Toss the bag in the garbage bin, preferably one with a secure lid, to prevent any unpleasant odors.
As for the paper towels you used during the cleaning process, follow these steps:
- Gather the used paper towels into a neat bundle.
- Place the bundle in a plastic bag.
- Securely tie the bag to prevent any leaks or spills.
- Dispose of the bag in the trash, ensuring it is properly sealed.
Sanitizing Your Workspace And Tools
Maintaining a clean and sanitized workspace is crucial to avoid any cross-contamination or potential health risks. Follow these steps to ensure your workspace and tools are properly sanitized:
- Prepare a solution of warm water and dish soap in a sink or basin.
- Thoroughly clean all surfaces that came into contact with the turkey, such as countertops, cutting boards, and utensils.
- Rinse the surfaces with warm water.
- Use an appropriate sanitizing agent, such as a diluted bleach solution, to sanitize the surfaces.
- Wipe down the surfaces with a clean towel or paper towel.
- Allow the surfaces and tools to air-dry completely before using them again.
Cleaning The Sink And Any Other Surfaces
As you clean the turkey, it’s not uncommon for juices and debris to end up in the sink or on surrounding surfaces. To ensure everything is properly cleaned, follow these steps:
- Start by rinsing the sink with warm water to remove any visible debris or residue.
- Apply a small amount of dish soap to a sponge or scrub brush.
- Thoroughly scrub the sink and surrounding surfaces, paying close attention to any stains or spots.
- Rinse the sink and surfaces with warm water to remove the soap and debris.
- Wipe everything dry with a clean towel or paper towel.
By properly disposing of gloves and paper towels, sanitizing your workspace and tools, and cleaning the sink and surrounding surfaces, you can ensure a safe and hygienic environment while preparing your turkey. Following these steps will help maintain cleanliness and minimize any potential health risks.
Frequently Asked Questions For How To Clean A Turkey?
How Do You Clean A Turkey Before Cooking It?
To clean a turkey before cooking it, start by removing the giblets and neck from the cavity. Rinse the turkey thoroughly under cold water, inside and out, to remove any remaining bits. Pat it dry with paper towels. Next, check for any lingering feathers and pluck them out with a pair of tweezers.
Trim off any excess fat or loose skin. You can also truss the turkey by tying the legs together with kitchen twine for even cooking. Remember to wash your hands and any utensils or surfaces that come into contact with raw turkey to prevent cross-contamination.
Avoid using soap or any harsh chemicals to clean the turkey, as it can leave behind residues. By following these simple steps, you will have a clean turkey ready for cooking.
What Is The Proper Way To Clean A Turkey?
To clean a turkey properly, follow these steps: 1. Remove the giblets and neck from the turkey cavity. 2. Rinse the turkey under cold water, inside and out. 3. Pat the turkey dry with paper towels. 4. Sanitize your kitchen surfaces and utensils used during the cleaning process to avoid cross-contamination.
Carefully following these guidelines will ensure that your turkey is clean and ready for cooking. Remember to wash your hands thoroughly after handling raw turkey to prevent the spread of bacteria. By keeping your turkey clean, you’ll ensure a safe and delicious meal for your family and friends.
Do You Wash The Inside Of A Turkey Before Cooking It?
No, it is not necessary to wash the inside of a turkey before cooking it.
Do You Wash A Whole Turkey?
Yes, you should wash a whole turkey before cooking it. Rinsing helps remove any dirt or bacteria on the surface. To wash it, place the turkey in a clean sink and gently pour cold water over it. Make sure to rinse the inside cavity as well.
Use your hands to rub the turkey’s skin to remove any loose feathers or excess fat. After washing, pat the turkey dry with paper towels. Remember to clean your sink and any utensils or surfaces that came into contact with the raw turkey to prevent cross-contamination.
However, avoid washing the turkey too far in advance as it can increase the risk of bacterial growth. Ready to cook your turkey now!
Conclusion
To sum up, cleaning a turkey thoroughly is crucial for maintaining food safety and ensuring a delicious Thanksgiving meal. By following the step-by-step process outlined you can remove any lingering bacteria or contaminants from the bird. Start by preparing your workspace and gathering the necessary tools, then proceed to remove the giblets and excess fat.
Next, rinse the turkey inside and out, being careful to avoid cross-contamination. Finally, pat the bird dry and store it properly until you’re ready to cook. Remember to practice good hygiene throughout the entire process, including washing your hands frequently and sanitizing all surfaces.
By taking these precautions, you can have peace of mind knowing that your turkey is clean and safe to eat. Happy Thanksgiving!