Last Updated on August 7, 2025
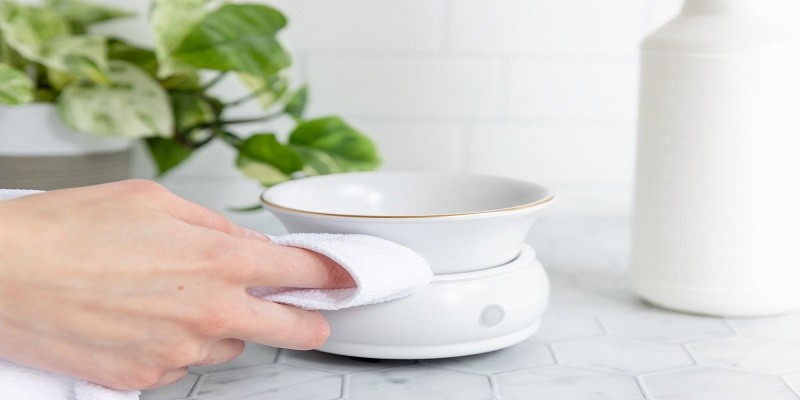
To clean a wax warmer, first, unplug the device and wait until the wax has completely cooled. Then, remove the wax dish and wipe it down with a paper towel or soft cloth.
Use a small scrub brush to clean the warmer’s chamber, gently removing any leftover residue. Finally, wipe the exterior of the wax warmer with a damp cloth, ensuring it is completely dry before plugging it back in.
Credit: devonwick.com
The Importance Of Cleaning Your Wax Warmer
Keeping your wax warmer clean is not just a matter of aesthetics; it is also crucial for the safety and effectiveness of your waxing sessions. Regular cleaning ensures that your wax warmer operates efficiently and prolongs its lifespan. Neglecting this essential maintenance task can lead to potential dangers and compromise the quality of your waxing experience.
To better understand the importance of cleaning your wax warmer, let’s explore why regular cleaning is necessary and the potential dangers of a dirty wax warmer.
Why Regular Cleaning Is Necessary:
- Prevents buildup: Over time, wax residue and debris can accumulate inside your wax warmer. Regular cleaning helps prevent this buildup, ensuring that the wax melts evenly and maintains the desired temperature.
- Preserves heating element: A clean wax warmer ensures that the heating element is free from any obstructions. This allows the wax to melt efficiently and evenly, making your waxing process smooth and hassle-free.
- Reduces contamination: Wax warmers are exposed to different types of contaminants, including dust, hair, and dead skin cells. Regular cleaning helps eliminate these contaminants, reducing the risk of cross-contamination and maintaining hygiene standards.
- Enhances performance: Cleanliness directly impacts the performance of your wax warmer. By keeping it clean and well-maintained, you can ensure it operates at its optimum level, providing consistent heat and smoother waxing results.
- Prolongs equipment life: Proper cleaning and maintenance can significantly extend the lifespan of your wax warmer. By preventing the accumulation of wax residue and other debris, you can avoid unnecessary wear and tear, saving you money on replacements.
The Potential Dangers Of A Dirty Wax Warmer:
- Fire hazard: A dirty wax warmer with excessive wax buildup can become a fire hazard. When the wax overheats or ignites due to the accumulation of flammable materials, it can pose a serious risk. Regular cleaning minimizes this danger, keeping both you and your surroundings safe.
- Decreased wax quality: A dirty wax warmer can affect the quality of your wax. As debris and contaminants mix with the melted wax, it can result in impurities and inconsistencies. This can affect the application and adherence of the wax, leading to subpar results.
- Skin irritation: When a wax warmer is not properly cleaned, it can harbor bacteria and germs. These contaminants can transfer to the wax and subsequently to your skin, increasing the risk of irritation and infection. Regular cleaning helps maintain a hygienic environment, reducing the likelihood of skin issues.
Now that you understand the importance of cleaning your wax warmer, you can ensure that your waxing experience remains safe, effective, and of the highest quality.
Step-By-Step Guide To Cleaning Your Wax Warmer
Cleaning your wax warmer is essential to ensure its optimal performance and prolong its lifespan. Regular maintenance will prevent buildup and ensure a clean and safe waxing experience. Follow this step-by-step guide to keep your wax warmer in pristine condition.
Gathering The Necessary Supplies:
To clean your wax warmer effectively, gather the following supplies:
- Mild dish soap
- Warm water
- Soft cloth or sponge
- Cotton swabs
- Rubbing alcohol
- Paper towels
Safely Unplugging And Cooling The Wax Warmer:
Before cleaning your wax warmer, always ensure it is safely unplugged from the electrical outlet and has cooled down completely. This reduces the risk of accidents and allows for a thorough cleaning process.
Removing Any Remnants Of Wax:
Begin by removing any leftover wax from your wax warmer. To do this, gently scrape off the hardened wax using a plastic spatula or a damp cloth. Be careful not to use any sharp objects that may damage the heating plate or dish.
Wiping Down The Interior And Exterior Surfaces:
Using a soft cloth or sponge, wipe down the interior and exterior surfaces of the wax warmer. Dampen the cloth or sponge with warm water and mild dish soap, and gently scrub away any dirt or residue. Rinse the cloth or sponge thoroughly and wipe down the surfaces again to remove any soap residue.
Cleaning The Heating Plate Or Dish:
To clean the heating plate or dish, soak a cotton swab in rubbing alcohol and gently rub it over the surface. This will help remove any residual wax or buildup. If necessary, use a toothpick or cotton swab to reach into any crevices or hard-to-reach areas.
Wipe off any excess alcohol with a paper towel.
Maintaining The Cleanliness Of Your Wax Warmer:
To ensure the ongoing cleanliness of your wax warmer, there are a few practices you can incorporate into your routine:
- Regularly remove and clean the removable parts of your wax warmer, such as the lid or dish.
- Avoid using harsh chemicals or abrasive cleaning agents on your wax warmer, as they may damage the surfaces.
- Clean the wax warmer after each use to prevent wax residue from building up.
- Store your wax warmer in a clean and dry environment when not in use.
By following this step-by-step guide on how to clean your wax warmer, you can maintain its hygiene, improve its performance, and enjoy a worry-free waxing experience. Regular maintenance will ensure that your wax warmer continues to provide efficient and safe hair removal for years to come.
Tips And Tricks For Easy Wax Warmer Cleaning
Cleaning a wax warmer may seem like a daunting task, but with the right tips and tricks, it can be a breeze. Whether you’re dealing with stubborn residue or aiming to prevent future wax build-up, we’ve got you covered. In this section, we’ll explore using vinegar or lemon juice for stubborn residue, preventing wax build-up for easier future cleanings, and avoiding common mistakes that may damage the wax warmer.
Using Vinegar Or Lemon Juice For Stubborn Residue
- Vinegar: Mix equal parts vinegar and water in a bowl. Dampen a cloth or cotton pad with the solution and gently wipe the interior of the wax warmer. The acidity in vinegar helps dissolve stubborn wax residue.
- Lemon juice: Squeeze fresh lemon juice into a bowl and apply it onto a cloth or cotton pad. Gently rub the affected areas of the wax warmer. The natural citric acid in lemon juice aids in breaking down the residue.
Preventing Wax Build-Up For Easier Future Cleanings
- Regular maintenance: Clean your wax warmer after each use to prevent wax residue from building up. This will make future cleaning much easier.
- Use liners: Consider using wax liners or silicone cups in your warmer. These liners catch the melted wax, making clean-up a breeze. Simply remove and discard the liner when you’re done.
Avoiding Common Mistakes That May Damage The Wax Warmer
- Scratching the surface: When cleaning the wax warmer, avoid using abrasive materials or harsh chemicals that can scratch or damage the surface. Opt for gentle cleaning solutions mentioned earlier.
- Overheating: Be mindful of the temperature settings on your wax warmer. Excessive heat can cause the wax to burn and become difficult to clean. Follow the manufacturer’s instructions for safe usage.
Keeping a wax warmer clean doesn’t have to be a hassle. By following these tips and tricks, you’ll be able to maintain a clean wax warmer, ensuring it functions properly and prolonging its lifespan. Clean up with ease and enjoy your favorite wax melts without a worry!
Frequently Asked Questions On How To Clean A Wax Warmer?
How Often Should I Clean My Wax Warmer?
It is recommended to clean your wax warmer after every 5-6 uses to maintain optimal performance.
What Supplies Do I Need To Clean A Wax Warmer?
To clean a wax warmer, you will need paper towels, a soft cloth, warm water, mild soap, and cotton swabs.
How Do I Clean The Wax Residue From My Warmer?
To remove wax residue, allow the warmer to cool, then use a paper towel or soft cloth to wipe the melted wax away. For stubborn residue, use a cotton swab dipped in warm, soapy water.
Can I Clean The Dish Of The Wax Warmer In A Dishwasher?
No, it is not recommended to clean the dish of the wax warmer in a dishwasher. Hand washing with warm, soapy water is the safest and most effective method.
How Do I Clean The Exterior Of The Wax Warmer?
To clean the exterior, use a damp cloth or sponge and mild soap to gently wipe away any dirt or residue. Avoid getting water inside the warmer.
Conclusion
To keep your wax warmer in top condition and ensure a long-lasting performance, regular cleaning is essential. By following these simple steps to clean your wax warmer, you can maintain its functionality and extend its lifespan. Start by turning off and unplugging the warmer, allowing it to cool down completely.
Remove any residual wax using a butter knife or paper towel, and then wipe the surface with a damp cloth. For a deeper cleanse, use a cotton pad soaked in rubbing alcohol to remove any stubborn residue. Clean the dish or tray thoroughly with warm soapy water, ensuring no wax or debris remains.
Finally, dry all parts completely before reassembling the wax warmer. By following these steps on a regular basis, you can keep your wax warmer clean, hygienic, and ready for your next waxing session.