Last Updated on August 7, 2025
To clean the thermocouple on a water heater, turn off the gas supply, disconnect the thermocouple from the gas control valve, clean the end of the thermocouple with sandpaper, and reattach it to the gas control valve. Is your water heater not functioning optimally?
It could be due to a dirty thermocouple. The thermocouple is a safety device that regulates the gas supply in the water heater. Over time, it can accumulate dirt and debris, causing it to malfunction. Cleaning the thermocouple is a simple yet crucial maintenance task that can help restore your water heater’s efficiency.
We will guide you through the process of cleaning the thermocouple on a water heater, ensuring smooth operation and extending the lifespan of your appliance. Read on to discover the step-by-step instructions for a hassle-free cleaning process.
The Role Of A Thermocouple In A Water Heater
A thermocouple plays a crucial role in a water heater by sensing the pilot light’s presence and ensuring the gas valve remains open. Cleaning the thermocouple regularly is essential to maintain its functionality and prevent problems with the water heater’s operation.
A water heater plays a crucial role in providing hot water for various household tasks such as showering, washing dishes, or doing laundry. But have you ever wondered how it works behind the scenes? One important component that ensures the safe and efficient operation of a water heater is the thermocouple.
In this section, we will delve into the purpose of a thermocouple and why keeping it clean is essential for the optimal performance of your water heater.
Explaining The Purpose Of A Thermocouple In A Water Heater
In a water heater, a thermocouple is a safety device that serves two main purposes:
- Safety Control: The thermocouple acts as a safety control mechanism, monitoring the pilot light. It detects whether the pilot flame is burning or has gone out. If the pilot flame is extinguished, the thermocouple sends a signal to the gas valve, shutting off the gas supply to prevent the accumulation of unburned gas.
- Heat Sensor: Apart from its safety function, the thermocouple also acts as a heat sensor. It measures the temperature of the water to ensure optimal heating. When the water reaches the desired temperature, the thermocouple signals the gas valve to stop the burner from heating further.
Highlighting The Importance Of A Clean Thermocouple For Efficient Operation
To ensure the smooth operation of your water heater, it is vital to keep the thermocouple clean. Here’s why:
- Unimpeded Signal Transmission: A clean thermocouple enables the proper transmission of signals. Dust, debris, or soot can hinder the communication between the thermocouple and the gas valve, leading to incorrect readings or a failure to detect a pilot flame outage. Cleaning the thermocouple helps maintain clear and reliable signal transmission.
- Optimal Heat Sensing: Over time, the thermocouple can accumulate dirt or grime, affecting its ability to sense heat accurately. A dirty thermocouple may result in the water heater malfunctioning or constantly heating the water to excessive temperatures. Regular cleaning ensures optimal heat sensing, allowing the thermocouple to regulate the temperature effectively.
- Longevity of the Thermocouple: By removing any dirt or residue from the thermocouple, you can enhance its lifespan. Preventing the build-up of impurities reduces the risk of corrosion or damage, ensuring the thermocouple remains functional for a longer period. Regular cleaning can save you from the hassle and expense of replacing a faulty thermocouple.
Understanding the purpose of a thermocouple in a water heater equips you with the knowledge necessary to keep it clean. Regular maintenance and cleaning of the thermocouple are vital for its efficient operation and the overall performance of your water heater.
Signs Of A Dirty Thermocouple And Its Impact
Thermocouples can get dirty over time, which can lead to issues with your water heater. Common signs of a dirty thermocouple include a pilot light that won’t stay lit or a water heater that won’t produce hot water. Cleaning the thermocouple is a simple task that can help restore its functionality.
Identifying Common Signs Of A Dirty Thermocouple:
A dirty thermocouple can cause problems with your water heater’s performance and safety. By being aware of the signs, you can take steps to clean it before it disrupts your everyday life. Here are some common indicators that your thermocouple might be dirty:
- #### Pilot light keeps going out:
- Once you’ve successfully lit the pilot light, it unexpectedly extinguishes.
- This frequent occurrence may be due to a dirty thermocouple, preventing proper heat detection.
- #### Inconsistent hot water supply:
- The water temperature fluctuates unexpectedly, becoming lukewarm or even cold at times.
- A dirty thermocouple can disrupt the gas flow, affecting the water heater’s ability to maintain a consistent temperature.
- #### Difficulty in lighting the pilot light:
- When attempting to ignite the pilot light, you may face challenges getting it to stay lit.
- A dirty thermocouple can interfere with the proper functioning of the pilot light, making it harder to light and stay ignited.
- #### Sooty appearance near the burner area:
- You notice visible black soot accumulating near the burner or combustion chamber.
- A dirty thermocouple can cause incomplete combustion, leading to the production of soot and other byproducts.
- #### Unusual noises from the water heater:
- You hear strange noises, such as popping, banging, or hissing coming from the water heater.
- A dirty thermocouple can disrupt the combustion process, resulting in unusual noises as the system struggles to operate correctly.
Discussing The Potential Consequences Of A Dirty Thermocouple On Water Heater Performance And Safety:
A dirty thermocouple can impact both the performance and safety of your water heater. Ignoring the issue can lead to more severe problems and potentially hazardous situations. Let’s explore the potential consequences of a dirty thermocouple:
- #### Reduced energy efficiency:
- A dirty thermocouple hampers proper heat detection, resulting in decreased energy efficiency.
- This inefficiency translates into higher energy consumption, leading to increased utility bills.
- #### Insufficient hot water supply:
- With a compromised thermocouple, the water heater may struggle to maintain a consistent and adequate supply of hot water.
- This can be particularly inconvenient and frustrating, especially when multiple household members need hot water simultaneously.
- #### Increased wear and tear on other components:
- A dirty thermocouple forces the water heater to operate under suboptimal conditions, which can accelerate wear and tear on other components.
- This can result in the need for costly repairs or premature replacement of the entire unit.
- #### Risk of gas leaks or carbon monoxide (CO) exposure:
- A malfunctioning thermocouple can disrupt the gas flow and lead to gas leaks or the release of harmful carbon monoxide gas.
- These situations pose significant safety risks and should be addressed promptly by a professional.
- #### Shortened lifespan of the water heater:
- A consistently dirty thermocouple can cause long-term damage to the water heater, reducing its overall lifespan.
- Regular cleaning and maintenance of the thermocouple help extend the life of your water heater, saving you money in the long run.
By recognizing the signs of a dirty thermocouple and understanding the potential consequences, you can take proactive measures to keep your water heater running efficiently and safely. Regular maintenance and cleaning are key to ensuring optimal performance and longevity of your water heating system.
Step-By-Step Guide To Cleaning A Thermocouple
Looking to clean the thermocouple on your water heater? This step-by-step guide will walk you through the process, ensuring efficient and reliable performance.
How To Clean Thermocouple On Water Heater?
Is your water heater not functioning properly? The thermocouple could be the culprit. Over time, it can accumulate dirt and debris, hindering its performance. Cleaning the thermocouple can often solve the issue, saving you the hassle and expense of replacing it entirely.
In this step-by-step guide, we’ll walk you through the process of cleaning a thermocouple on a water heater. Let’s get started!
Gathering The Necessary Tools And Materials:
Before you begin cleaning the thermocouple, it’s important to gather all the tools and materials you’ll need. Here’s what you’ll need:
- Adjustable wrench
- Sandpaper or emery cloth
- Cleaning solution (mild soap or vinegar)
- Soft-bristle brush
- Paper towels or clean cloth
Turning Off The Water Heater And Disconnecting The Gas Supply:
It’s crucial to turn off the water heater and disconnect the gas supply before attempting any maintenance. Here’s how to do it:
- Locate the gas control valve on the water heater and turn it to the “Off” position.
- Shut off the cold water supply valve that feeds into the water heater.
- If you have a gas water heater, turn the main gas supply valve off to ensure no gas is flowing to the appliance.
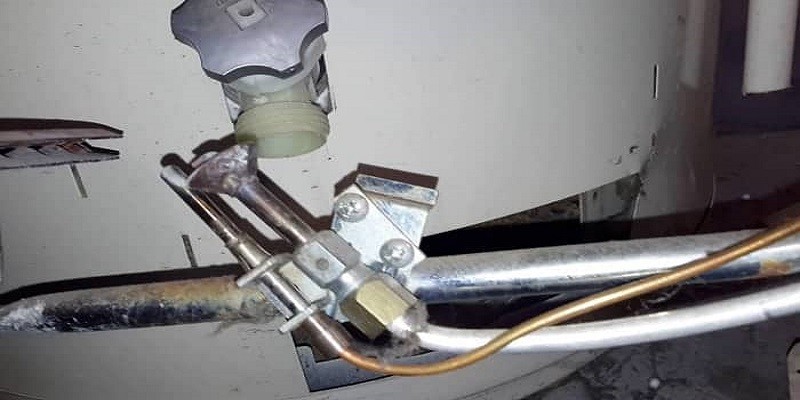
Accessing And Removing The Thermocouple:
To clean the thermocouple, you’ll need to access and remove it from the water heater. Follow these steps:
- Remove the outer access panel on the water heater to expose the burner assembly.
- Locate the thermocouple, which is a small metal rod positioned near the burner.
- Using an adjustable wrench, loosen the nuts connecting the thermocouple to the gas control valve and the burner assembly.
- Carefully disconnect the thermocouple from both ends and remove it from the water heater.
Cleaning The Thermocouple Using Appropriate Methods:
Now that you have the thermocouple removed, it’s time to clean it. Follow these steps:
- Inspect the thermocouple for any visible dirt, debris, or corrosion.
- Use sandpaper or emery cloth to gently clean the thermocouple’s metal surface, removing any buildup or oxidation.
- If there are stubborn deposits, soak the thermocouple in a cleaning solution made of mild soap or vinegar for a few minutes.
- Scrub the thermocouple with a soft-bristle brush to remove any remaining residue.
- Rinse the thermocouple thoroughly with clean water and dry it with paper towels or a clean cloth.
Reinstalling The Thermocouple And Reconnecting The Gas Supply:
Now that your thermocouple is clean, it’s time to reinstall it and reconnect the gas supply. Here’s how to do it:
- Align the thermocouple with its original position near the burner and reconnect it to the gas control valve and burner assembly.
- Tighten the nuts securely with an adjustable wrench, ensuring a proper connection.
- Replace the outer access panel on the water heater, securing it in place.
Restarting The Water Heater And Ensuring Proper Functionality:
With the thermocouple cleaned and reinstalled, it’s time to restart the water heater and ensure it’s functioning correctly. Follow these final steps:
- Turn the main gas supply valve back on if you have a gas water heater.
- Turn the gas control valve on the water heater to the “On” position.
- Slowly open the cold water supply valve to refill the tank.
- Light the pilot light according to the manufacturer’s instructions.
- Once the water heater is operational, check for any signs of improvement or recurring issues.
By following this step-by-step guide, you can effectively clean the thermocouple on your water heater, potentially resolving any performance issues. Remember to exercise caution when working with gas appliances and consult a professional if you’re unsure or uncomfortable performing these tasks.
A well-maintained thermocouple can extend the life of your water heater and ensure hot water on demand.
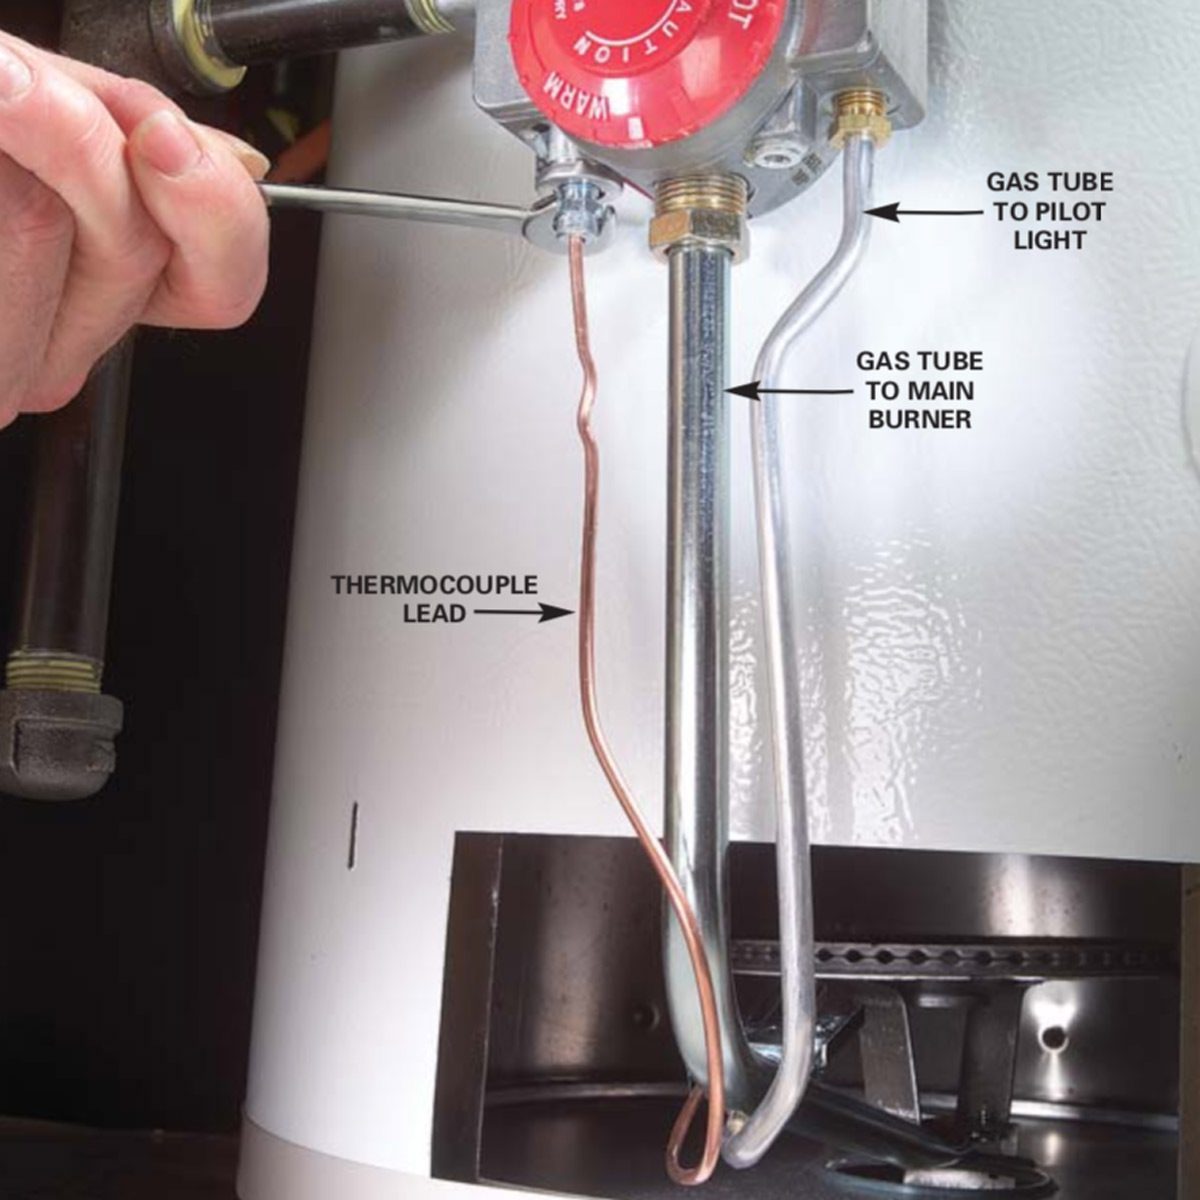
Credit: www.familyhandyman.com
Tips And Precautions For A Successful Cleaning Process
Discover essential tips and precautions for a successful cleaning process of a thermocouple on a water heater. Learn how to effectively clean and maintain your water heater to maximize its efficiency and longevity.
Providing Recommendations For Safe And Effective Cleaning:
To ensure the safety and effectiveness of cleaning your thermocouple on a water heater, follow these recommendations:
- Turn off the power: Before starting the cleaning process, make sure to turn off the power supply to the water heater. This will prevent any accidents or electric shocks.
- Gather the necessary tools: Gather all the tools you’ll need for the cleaning process, including a wrench, a wire brush, and a clean cloth. Having everything prepared in advance will make the process smoother.
- Disconnect the thermocouple: Locate the thermocouple on the water heater and carefully disconnect it from the gas valve. This will allow you to clean it thoroughly without any obstructions.
- Clean with a wire brush: Use a wire brush to gently clean the thermocouple. Be careful not to apply too much force as this can damage the delicate components.
- Remove dust and debris: Ensure that you remove any dust or debris that may have accumulated on the thermocouple. This will optimize its performance and accuracy.
- Inspect for damage: While cleaning, take the opportunity to inspect the thermocouple for any signs of damage or wear. If you notice any issues, it may be time to replace the thermocouple altogether.
- Reconnect and test: Once the cleaning is complete, reconnect the thermocouple to the gas valve. Then, turn on the power supply to the water heater and test its functionality. Ensure that the thermocouple is properly connected and functioning as expected.
Highlighting Common Mistakes To Avoid During The Cleaning Process:
Avoid these common mistakes when cleaning your thermocouple on a water heater:
- Applying excessive force: Do not apply excessive force when cleaning the thermocouple. Use a gentle touch with the wire brush to avoid damaging the delicate components.
- Neglecting safety precautions: Always prioritize safety during the cleaning process. Remember to turn off the power supply to the water heater before starting and wear protective gloves if necessary.
- Using harsh chemicals: Avoid using harsh chemicals or abrasive materials to clean the thermocouple. These can cause damage and compromise its functionality.
- Skipping inspection: Take the time to inspect the thermocouple for any signs of damage or wear. Ignoring this step may lead to future problems with the water heater.
- Rushing the process: Take your time when cleaning the thermocouple. Rushing through the process may result in an incomplete cleaning or overlooking potential issues.
- Failing to test functionality: After reconnecting the thermocouple, don’t forget to test the water heater’s functionality. This step is crucial for ensuring that the cleaning process was successful.
Remember, following these tips and precautions will help you clean your thermocouple safely and effectively, improving the performance and longevity of your water heater.
Establishing A Regular Cleaning Routine
Regular cleaning of the thermocouple on your water heater is essential to ensure its proper functioning. Follow these steps to maintain its efficiency and reliability.
Regular cleaning of the thermocouple on a water heater is essential to maintain its efficiency and performance. Developing a consistent cleaning routine can help prolong the lifespan of your water heater and prevent potential issues. In this section, we will discuss the recommended frequency for cleaning a thermocouple and highlight the benefits of regular maintenance on water heater performance.
Discussing The Recommended Frequency For Cleaning A Thermocouple:
- Annual cleaning: It is generally recommended to clean the thermocouple on your water heater at least once a year. This frequency allows for the removal of any accumulated dirt, debris, or soot that may hinder its functionality.
- Increased frequency with heavy usage: If your water heater is subjected to heavy usage, such as in commercial settings or households with high hot water demand, it is advisable to clean the thermocouple more frequently. This helps ensure optimal performance and reduces the risk of malfunctions.
Regular cleaning of the thermocouple not only helps maintain its efficiency but also prevents potential problems that can arise from dirt or buildup. By following the recommended cleaning frequency, you can avoid the inconvenience of sudden breakdowns and extend the lifespan of your water heater.
Explaining The Benefits Of Regular Maintenance On Water Heater Performance:
- Optimized performance: Regularly cleaning the thermocouple removes dirt and debris that can impede its proper functioning. This leads to improved heat transfer, faster heating times, and consistent hot water temperatures.
- Enhanced energy efficiency: A clean thermocouple allows your water heater to operate at its highest efficiency level, reducing energy waste and lowering your utility bills.
- Reduced risk of malfunctions: Accumulated dirt or soot on the thermocouple can potentially lead to ignition problems, pilot light failure, or even complete shutdown of the water heater. By cleaning it regularly, you minimize the risk of these issues and ensure a reliable supply of hot water.
- Extended lifespan: Routine maintenance and cleaning of the thermocouple can significantly extend the lifespan of your water heater. By preventing corrosion, improving performance, and reducing strain on the system, you can enjoy the benefits of your water heater for years to come.
Incorporating a regular cleaning routine for the thermocouple is a vital aspect of water heater maintenance. By dedicating a small portion of your time to this task, you can optimize your water heater’s performance, reduce the risk of malfunctions, and prolong its lifespan.
Other Maintenance Practices To Enhance Thermocouple Performance
To enhance thermocouple performance on a water heater, there are various maintenance practices that can be carried out. These include regular cleaning of the thermocouple to remove any dirt or debris that may be affecting its performance. Proper cleaning can help ensure optimal functioning of the thermocouple and contribute to the efficient operation of the water heater.
Regular cleaning of the thermocouple is essential for maintaining the efficiency of your water heater. However, there are other maintenance practices that can further enhance the performance of the thermocouple and the overall functioning of the water heater system. Here are some additional steps you can take to optimize your water heater’s efficiency:
Inspect The Pilot Light:
- Ensure that the pilot light is consistently lit and burning bright blue. A weak flame or a flame that flickers or goes out frequently indicates a potential issue with the thermocouple or other components.
Check The Gas Supply:
- Verify that the gas supply to the water heater is adequate. Low gas pressure can lead to improper combustion and affect the performance of the thermocouple.
Examine The Gas Burner:
- Inspect the gas burner regularly to ensure it is clean and free from debris. A dirty burner can hinder proper combustion and cause improper contact with the thermocouple.
Test The Thermopile:
- The thermopile is a sensor that generates electricity to power the gas valve and control the flow of gas. Use a multimeter to test the thermopile’s voltage output. If it falls below the recommended range, it may need to be replaced.
Insulate Hot Water Pipes:
- Adding insulation to the hot water pipes can help minimize heat loss during distribution. This reduces the workload on the water heater, allowing it to operate more efficiently.
Flush The Water Tank:
- Sediment buildup can affect the performance of the water heater and indirectly impact the thermocouple. Regularly flushing the water tank helps remove sediment, preventing clogs and maintaining optimal performance.
Check The Temperature Pressure Relief Valve:
- Inspect the temperature pressure relief valve annually to ensure proper functioning. This valve prevents excessive pressure or temperature buildup, which can lead to damage to the water heater system.
Test The Temperature Setting:
- Ensure that the temperature setting on the water heater is not too high. Higher temperatures not only pose safety risks but also increase energy consumption. Adjust the temperature setting to a suitable level, balancing comfort and efficiency.
Maintain Proper Venting:
- Adequate venting is crucial for the safe operation of a water heater. Check for any obstructions or blockages in the venting system. A clear and well-functioning venting system helps maintain optimal combustion and thermocouple performance.
Schedule Professional Maintenance:
- While regular cleaning and maintenance can extend the life of your water heater, it is recommended to schedule professional maintenance at least once a year. A qualified technician can thoroughly inspect and tune up your water heater, ensuring its smooth operation and maximizing the efficiency of the thermocouple.
By following these additional maintenance practices, you can enhance the overall efficiency of your thermocouple and water heater system, ensuring reliable performance and cost-effective operation in the long run.
Frequently Asked Questions For How To Clean Thermocouple On Water Heater?
Should I Clean Or Replace Thermocouple On Water Heater?
Before determining whether to clean or replace the thermocouple on your water heater, it’s important to understand its purpose. The thermocouple is a safety device that detects whether the pilot light is on. If the thermocouple is malfunctioning and prevents the pilot light from staying lit, it may need to be cleaned or replaced.
Cleaning the thermocouple involves removing any dirt or debris that may be interfering with its function. However, if cleaning doesn’t resolve the issue and the pilot light still won’t stay lit, it’s likely time to replace the thermocouple. Replacing the thermocouple is a relatively simple process, and it’s recommended to use a new one to ensure optimal performance.
In summary, cleaning the thermocouple may solve the problem, but if it doesn’t, replacing it is the next step to ensure your water heater operates safely and efficiently.
How Do I Know If My Thermocouple Is Dirty?
A dirty thermocouple can cause issues. Look for these signs: decreased gas flow, weak flame, and frequent pilot light going out.
How Do You Clean A Thermocouple On An Electric Water Heater?
To clean a thermocouple on an electric water heater, follow these steps. First, turn off the power supply to the heater. Then, locate the thermocouple, which is usually near the burner. Use a wrench to disconnect the thermocouple from the gas valve.
Gently clean the thermocouple with a soft cloth or fine grit sandpaper to remove any dirt or debris. Make sure to be gentle to avoid damaging the thermocouple. Once the thermocouple is clean, reconnect it to the gas valve using the wrench.
Finally, turn the power supply back on and test the hot water to ensure the thermocouple is functioning properly. Cleaning the thermocouple regularly can help improve the performance and efficiency of your electric water heater.
How Do I Know If My Thermocouple Is Bad On My Water Heater?
To check if your thermocouple is faulty on your water heater, follow these steps: 1. Turn off the gas supply to the water heater. 2. Locate the thermocouple near the pilot light assembly. 3. Check for any visible damage or corrosion on the thermocouple.
4. Gently clean the thermocouple using a soft brush or cloth. 5. Reconnect the thermocouple to the pilot light assembly securely. 6. Turn on the gas supply and relight the pilot light. 7. Hold down the pilot light button for 60 seconds while observing the flame.
8. If the pilot light goes out after releasing the button, the thermocouple is likely faulty. 9. A faulty thermocouple may also cause the water heater to shut off unexpectedly. Remember, if you are unsure or uncomfortable performing these steps, it is best to consult a professional plumber or technician to diagnose and repair the issue with your water heater.
Conclusion
Taking the time to clean the thermocouple on your water heater is a simple yet important maintenance task that can help ensure its efficient operation. By following the steps outlined in this blog post, you can easily remove any build-up or debris that may be interfering with the thermocouple’s function.
Keep in mind that safety should always be your top priority, so be sure to turn off the gas supply and allow the water heater to cool before starting the cleaning process. Regularly cleaning the thermocouple can prevent issues such as a pilot light that won’t stay lit or a water heater that doesn’t heat water properly.
By incorporating this simple cleaning routine into your regular water heater maintenance, you can extend the lifespan of your water heater and enjoy hot water without any interruptions.