Creating a DIY craft station at home can be fun and rewarding. With a dedicated space, your creativity can flow freely.
Crafting at home offers a great way to unwind and express yourself. Having a well-organized craft station makes it easier to work on projects. It keeps all your supplies in one place, ready for use. No more searching for that elusive glue stick or favorite paintbrush.
Designing your own craft station allows you to tailor it to your needs. You can include all the tools and materials you use most often. Plus, it can be a fun project in itself. Whether you’re a seasoned crafter or just starting out, a DIY craft station can enhance your crafting experience. Ready to get started? Let’s dive in!

Credit: whatmomslove.com
Choosing The Right Space
Select a quiet, well-lit corner for your DIY craft station at home. Ensure the space has enough room for supplies and tools.
Creating a DIY craft station at home can be an exciting project. Choosing the right space for your craft station is crucial for maximizing creativity and productivity. Let’s dive into how you can select the perfect area in your home.
Assessing Available Areas
First, look around your home to identify potential spots for your craft station. Consider spaces like unused corners, closets, or even under the stairs.
Think about where you spend most of your time. Would it be convenient to have your craft station near your living room or bedroom?
Avoid spaces that are too cramped. You need enough room to spread out your supplies and work comfortably.
Considering Lighting And Ventilation
Good lighting is essential for any craft project. Natural light can be a game-changer, so choose a space near a window if possible.
If natural light isn’t an option, invest in bright lamps or overhead lights. Make sure you can see your work clearly without straining your eyes.
Ventilation is another key factor. Crafting often involves using paints, glues, and other materials that can have strong odors. A well-ventilated area will keep your workspace fresh and pleasant.
Have you ever tried crafting in a poorly lit room? It’s frustrating, isn’t it? Proper lighting can make a huge difference in your crafting experience.
Choosing the right space for your DIY craft station involves a bit of planning. But with the right area, lighting, and ventilation, you’ll create a perfect spot for all your creative projects. Where will you set up your craft station?
Essential Supplies And Tools
Create a DIY craft station at home with essential supplies like scissors, glue, and colorful paper. Store tools in labeled containers for easy access. Ensure a clean, well-lit workspace to inspire creativity.
Creating a DIY craft station at home can be an exciting and rewarding project. Whether you’re a seasoned crafter or a beginner, having the right supplies and tools is crucial. Let’s dive into the essential supplies and tools you’ll need to set up your perfect craft station.
Basic Craft Materials
To start, you’ll need some basic craft materials. Think about the types of projects you enjoy. Do you love paper crafts? Stock up on cardstock, scrapbook paper, and glue sticks.
Are you into sewing? Gather fabric, thread, needles, and a good pair of scissors.
For those who enjoy painting, keep brushes, acrylic paints, and canvases on hand.
It’s helpful to have a variety of materials to inspire creativity. Here’s a quick list to get you going:
- Cardstock and scrapbook paper
- Glue sticks and liquid glue
- Fabric and thread
- Needles and scissors
- Brushes and acrylic paints
- Canvases
Storage Solutions
Organizing your supplies is as important as having them. Storage solutions can make or break your craft station. Consider using clear plastic bins for easy visibility of your materials.
Label containers so you can find what you need quickly. Use drawer organizers for smaller items like beads and buttons.
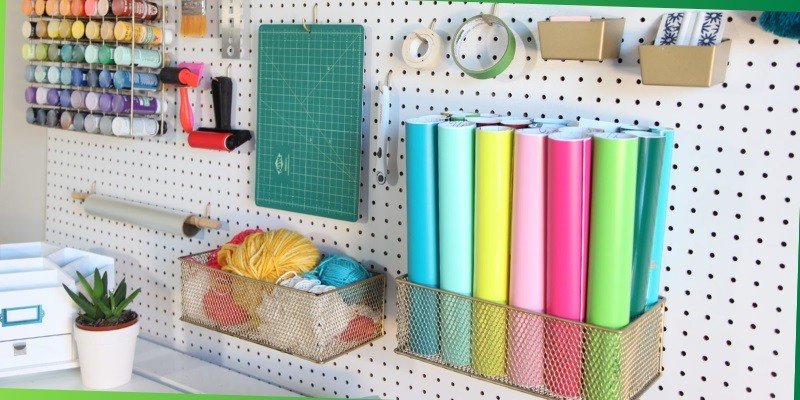
Pegboards are fantastic for hanging tools such as scissors and rulers.
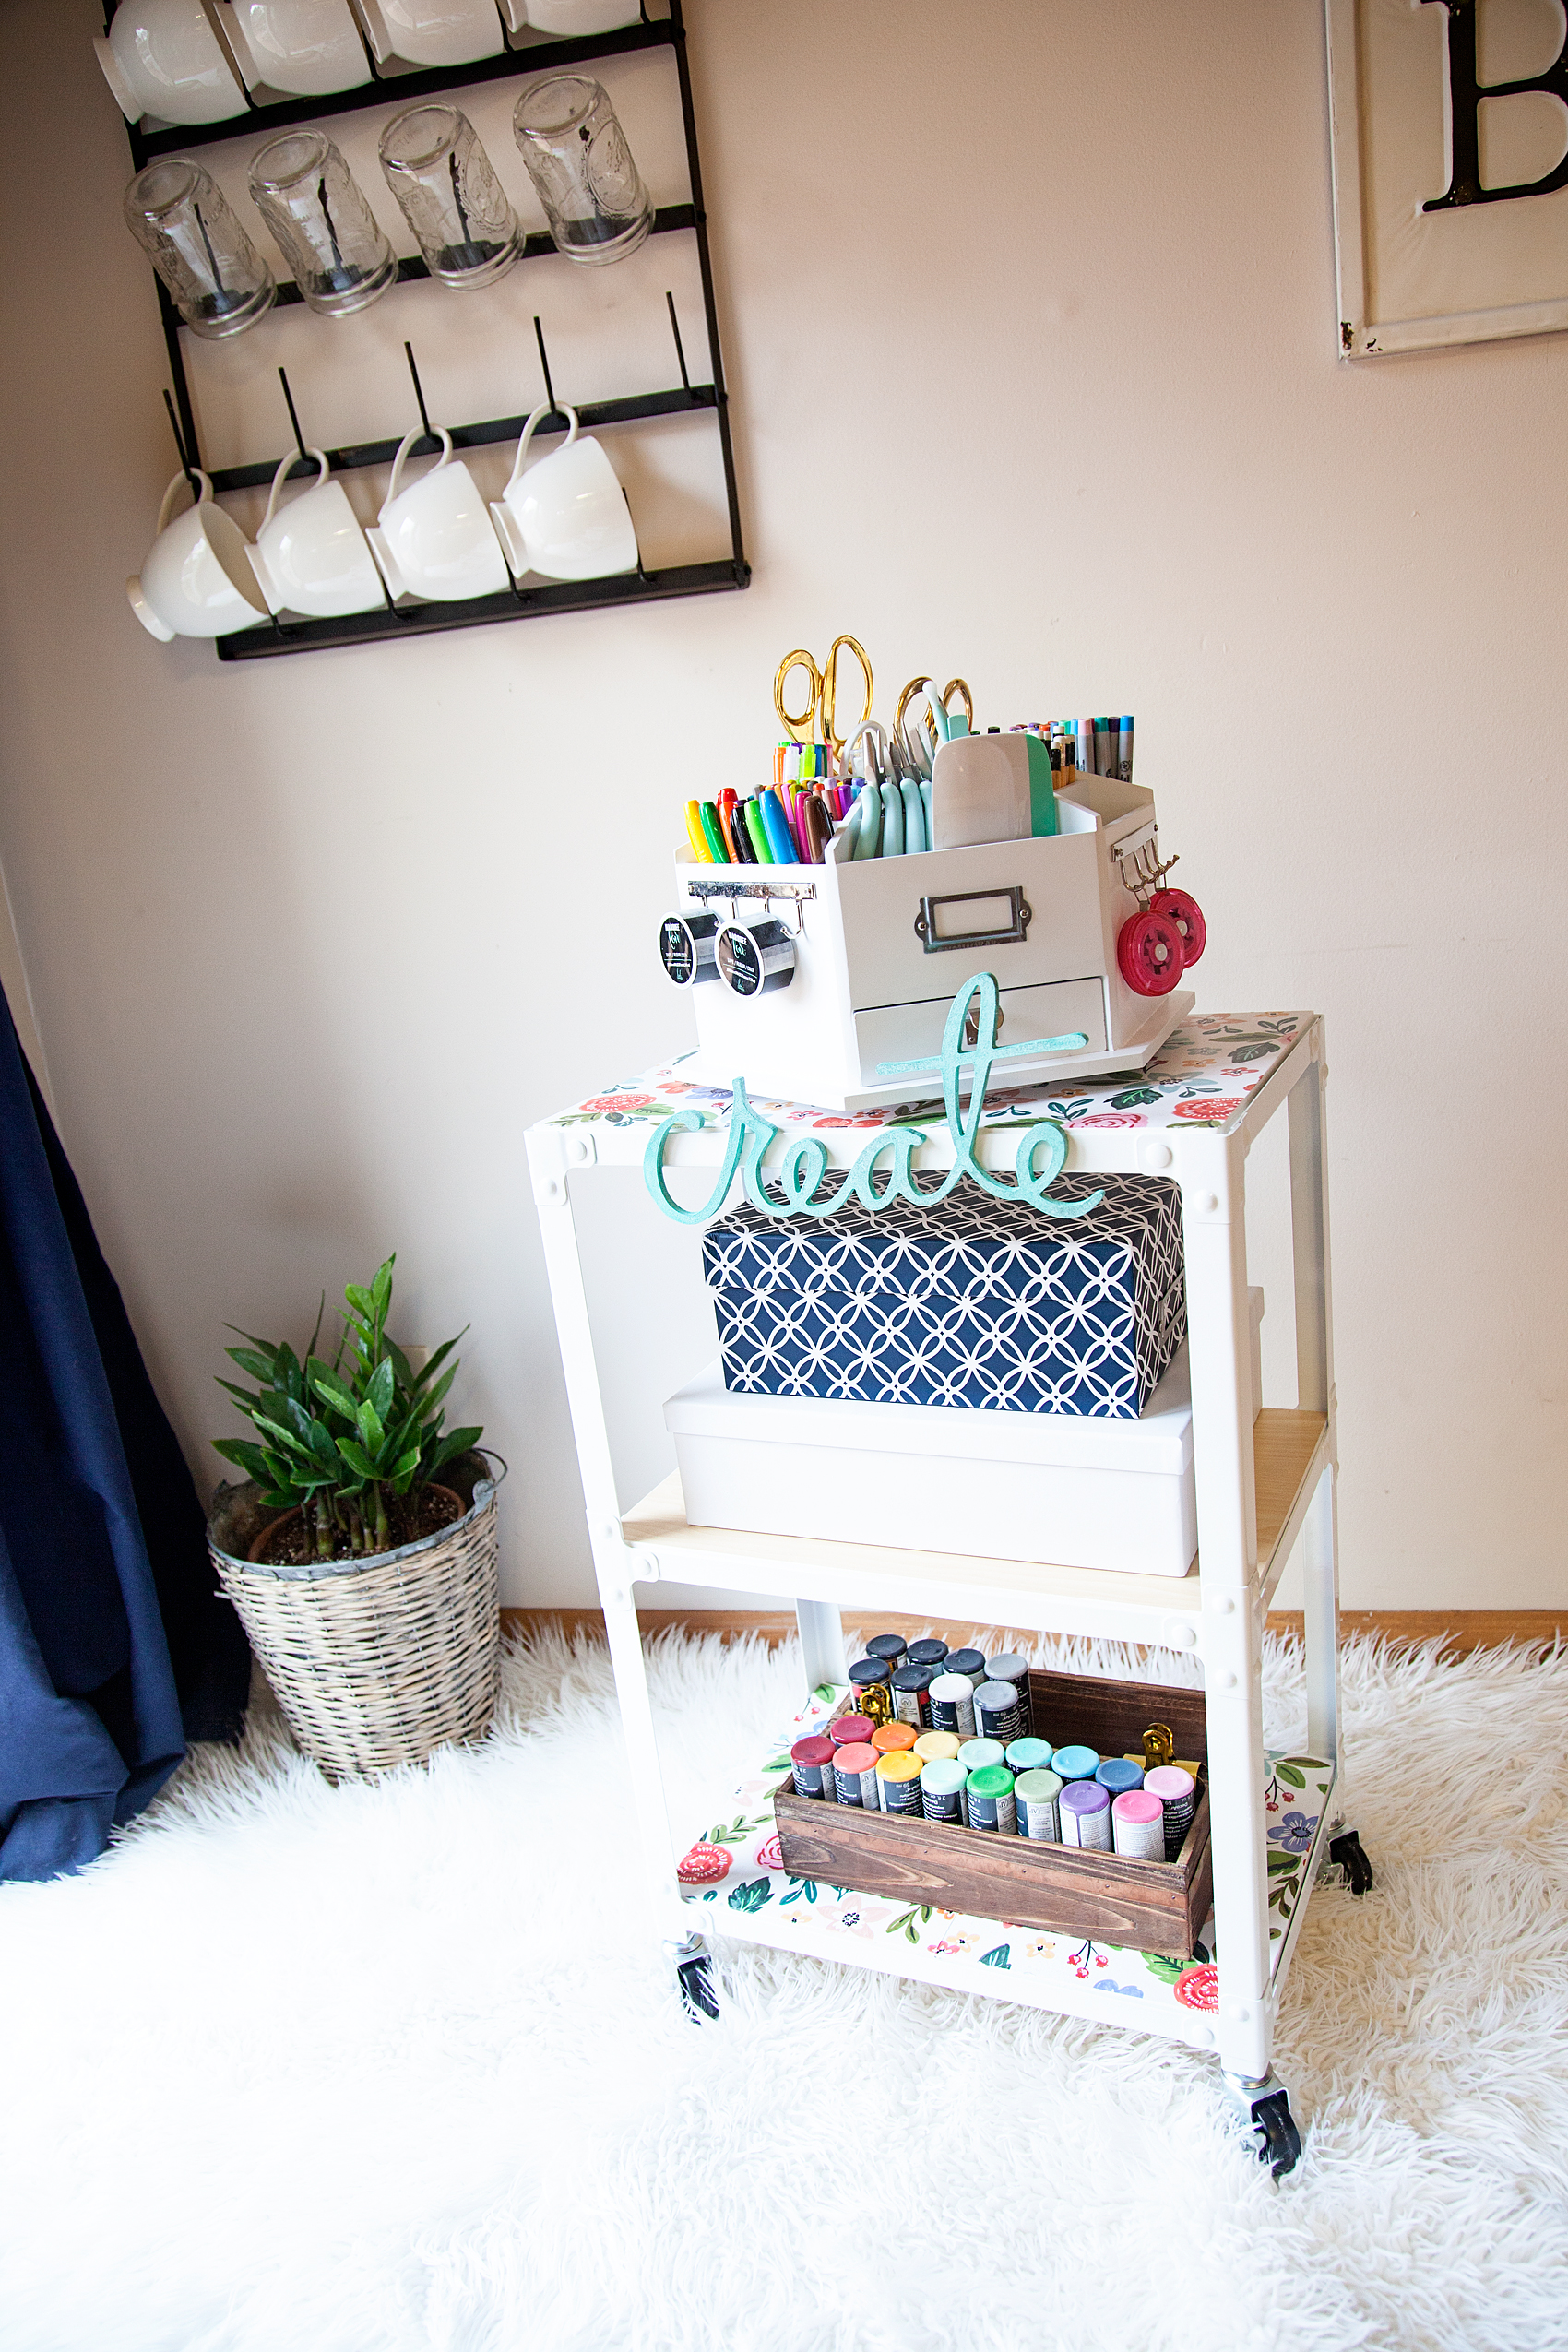
I found that adding a rolling cart gives me flexibility to move supplies around as needed.
Here are some ideas:
- Clear plastic bins
- Labels for containers
- Drawer organizers
- Pegboards for tools
- Rolling carts
What creative ways can you think of to store your materials efficiently?
Investing time in proper storage can save you hours in the long run.
Remember, a well-organized craft station sparks joy and enhances productivity.
Organizing Your Craft Station
Create a DIY craft station at home to keep your supplies organized and within reach. Use shelves, bins, and drawers to store materials neatly. Label everything for easy access and a clutter-free workspace.
Creating a DIY craft station at home can be both exciting and rewarding. One of the most crucial aspects of making your craft station effective is organizing it well. A well-organized craft station not only makes your crafting sessions more enjoyable but also enhances your creativity and productivity. Let’s dive into how you can organize your craft station effectively.
Categorizing Supplies
Start by categorizing your supplies. This step is essential for maintaining an orderly space. Group similar items together. For instance, keep all your paints in one section and your fabrics in another.
Use clear storage containers to easily identify what’s inside. Label each container for even more clarity. This way, you won’t waste time searching for that specific shade of blue or the right pair of scissors.
Consider using drawer organizers for smaller items like beads, buttons, and needles. This will help you keep everything in its place and avoid clutter.
Creating A Functional Layout
Think about the layout of your craft station. The goal is to make your space functional and easy to navigate. Position frequently used items within arm’s reach.
Set up your worktable near natural light if possible. Good lighting can make a significant difference in your crafting experience. If natural light isn’t an option, invest in a good desk lamp.
Use wall-mounted shelves to maximize vertical space. This can be especially useful if you’re working in a smaller area. Hanging baskets or pegboards can also help keep tools and materials off your workspace but within easy reach.
Organizing your craft station doesn’t have to be a chore. Make it a fun project, and you’ll enjoy your crafting time even more. What’s one organizational tip that has worked wonders for you? Share your thoughts!
Credit: whipperberry.com
Frequently Asked Questions
How To Create A Crafting Corner In Your Home?
Choose a quiet corner with good lighting. Add a sturdy table and comfortable chair. Organize supplies with shelves and bins. Decorate with inspiring artwork and tools. Keep it tidy and inviting.
How To Set Up A Craft Station?
Set up a craft station by choosing a well-lit area. Organize supplies in labeled containers. Use shelves for easy access. Add a comfortable chair and a sturdy table. Keep tools and materials within reach.
How Do I Organize All My Craft Supplies?
Use clear bins, label everything, and arrange by category. Utilize shelves, pegboards, and drawers to maximize space.
How Do You Declutter And Organize A Craft Room?
Sort items by category, discard unused supplies, use clear storage bins, label everything, and keep frequently used tools accessible.
What Materials Do I Need To Create A Diy Craft Station?
You need a table, storage bins, shelves, and crafting supplies. Simple and basic.
Conclusion
Creating a DIY craft station at home is both fun and rewarding. It keeps supplies organized and ready. Your creativity gets a dedicated space to flourish. Follow simple steps, use available materials, and personalize the setup. Enjoy a clutter-free, inspiring environment.
Now, get crafting and watch your projects come to life. Happy crafting!