Last Updated on August 7, 2025
To flush sediment out of a water heater, turn off the power supply, connect a hose to the drain valve, place the other end of the hose in a suitable drainage area, open the drain valve, and let the water flow until it runs clear. Water heaters can accumulate sediment over time, which can affect their efficiency and lifespan.
The sediment consists of minerals and debris from the water supply, and the accumulation can lead to poor heating performance and even damage to the heating elements. Flushing the water heater regularly helps remove the sediment and maintain its optimal functioning.
This process involves draining the water from the tank, along with any built-up sediment, through the drain valve. By following a few simple steps, you can effectively flush the sediment out of your water heater and ensure its longevity and efficiency.
The Benefits Of Flushing Sediment Out Of Your Water Heater
Flushing sediment out of your water heater holds numerous benefits, including improved efficiency, prolonged lifespan, and better water quality. Regular maintenance ensures optimal performance and saves you from potential costly repairs. Here’s how you can efficiently flush sediment out of your water heater.
Flushing sediment out of your water heater is an essential maintenance task that can provide several benefits. It not only prolongs the lifespan of your water heater but also improves its energy efficiency and prevents malfunctions and costly repairs.
Prolongs The Lifespan Of Your Water Heater:
- Regularly flushing out sediment can significantly extend the lifespan of your water heater.
- Sediment, such as minerals and debris, accumulates over time at the bottom of your heater’s tank. This buildup can lead to corrosion and rust, which can shorten the life of your water heater.
- Flushing the sediment helps remove these damaging particles, reducing the risk of deterioration and increasing the longevity of your unit.
Improves Energy Efficiency:
- Sediment buildup acts as an insulating layer, making it harder for your water heater to heat the water effectively.
- Flushing out the sediment allows your water heater to operate more efficiently, as the heating element can directly heat the water without any hindrance.
- By improving energy efficiency, you not only save money on energy bills but also reduce your carbon footprint.
Prevents Malfunctions And Costly Repairs:
- Sediment accumulation can lead to various issues within your water heater, such as clogs and leaks.
- Flushing out the sediment regularly helps prevent these malfunctions, ensuring your water heater operates smoothly.
- Additionally, flushing reduces the risk of issues caused by sediment, such as pressure relief valve failure or overheating.
- By taking preventative measures, you can avoid costly repairs and potentially extend the need for replacement.
Regular maintenance, including flushing out sediment, is crucial for the optimal performance of your water heater. By prolonging its lifespan, improving energy efficiency, and preventing malfunctions, you can ensure a reliable supply of hot water while saving money in the long run.
So, don’t overlook the importance of sediment flushing for your water heater’s overall health.
Step 1: Gather The Necessary Tools And Materials
Flushing sediment out of your water heater is an essential maintenance task to ensure optimal performance. Start by gathering the necessary tools and materials, including a hose, a bucket, and a screwdriver.
To flush sediment out of a water heater, you will need the following tools and materials:
- Garden hose: This will be used to drain the water from the heater.
- Bucket: You’ll need a bucket to catch the water as it drains out.
- Screwdriver: A screwdriver is necessary to open the drain valve.
- Adjustable wrench: This tool will be used to disconnect the water heater’s power and water supply.
Now that you have all the necessary tools and materials ready, you can proceed to the next step of flushing sediment out of your water heater.
Step 2: Turn Off The Water Heater
To flush sediment out of a water heater, follow Step 2 by turning off the water heater. This crucial step ensures the safety of the process and allows for effective removal of sediment buildup.
Before starting the sediment flushing process, it is crucial to turn off the water heater to ensure safety and prevent any accidents. Here are the steps to follow:
- Shut off the gas or electricity supply: Depending on the type of water heater you have, you will either need to turn off the gas or electricity supply. Here’s how:
For gas water heaters:
- Locate the gas control valve near the bottom of the water heater.
- Turn the valve to the “off” position. You may need to rotate the valve handle a quarter turn or align it with the “off” indicator.
- If you have a pilot light, follow the manufacturer’s instructions to safely turn it off.
For electric water heaters:
- Find the circuit breaker or fuse box that controls the water heater’s power supply.
- Look for the breaker or fuse labeled specifically for the water heater.
- Flip the breaker switch to the “off” position or remove the fuse.
- Locate the water shut-off valve and turn it off: This step prevents water from entering the tank while you’re flushing out the sediment. Follow these instructions:
- Look for the water shut-off valve near the top of the water heater. It is usually a lever or a knob.
- Turn the valve clockwise or perpendicular to the water pipe to shut it off. This will stop the water flow into the water heater.
Remember, safety should always be the top priority when dealing with water heaters. Take appropriate precautions, such as wearing gloves and following manufacturer’s instructions, to flush out the sediment effectively.
Step 3: Drain The Water Heater
To flush sediment out of a water heater, start by draining the water heater in step 3. This is a crucial step to remove any built-up sediment and maintain the efficiency of your water heater.
Flushing sediment out of your water heater is an essential maintenance task that helps improve its efficiency and prolong its lifespan. In Step 3 of the sediment flushing process, you will need to drain the water heater. Follow these simple steps to ensure a smooth and effective flushing process:
Connect The Garden Hose To The Drain Valve:
- Locate the drain valve at the bottom of your water heater tank.
- Attach one end of a garden hose securely to the drain valve.
- Make sure the connection is tight to avoid any leaks.
Place The Other End Of The Hose In A Safe Drain Location:
- Find a suitable drain location where the discharged water and sediment can safely flow without causing any damage.
- Ensure the drain location is away from any electrical devices or areas prone to water damage.
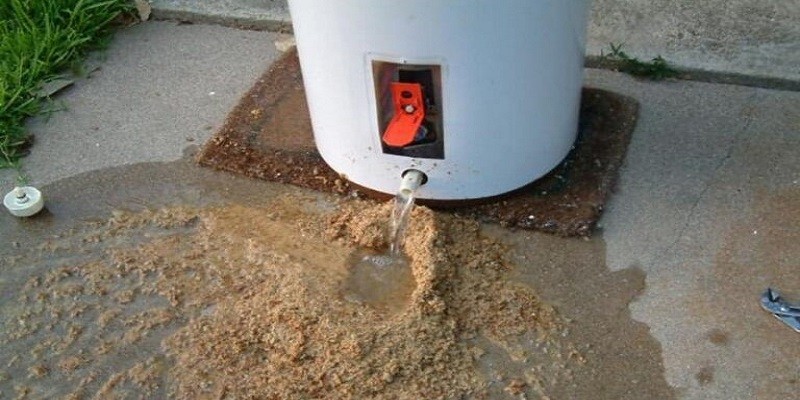
Open The Drain Valve To Allow The Sediment And Water To Flow Out:
- Slowly turn the drain valve counterclockwise to open it.
- Be cautious as the water might be hot, causing burns or scalding.
- Allow the water to flow out until it becomes clear and free of sediment.
By following these steps, you can effectively drain the water heater and eliminate the built-up sediment, allowing for better performance and efficiency. Keep in mind that regular maintenance, including flushing the sediment, is crucial to ensuring the optimal functioning of your water heater.
Step 4: Flush Out The Sediment
To flush sediment out of a water heater, follow step 4 by thoroughly removing any built-up debris, helping to maintain the heater’s efficiency and prolong its lifespan.
To ensure optimal performance and extend the lifespan of your water heater, it is essential to flush out any accumulated sediment regularly. This step-by-step guide will walk you through the process:
Close the drain valve once the water runs clear:
- Turn off the water heater and locate the drain valve near the bottom of the unit.
- Attach a hose to the valve and place the other end into a suitable drainage area.
- Open a hot water faucet in your home to allow air to enter the system, helping with the draining process.
- Slowly open the drain valve and let the water flow out.
- Once the water runs clear, close the drain valve tightly.
Turn on the water supply to flush out any remaining sediment:
- Remove the hose from the drain valve.
- Close the hot water faucet that was left open earlier.
- Locate the cold water inlet valve, usually found near the top of the water heater.
- Slowly open the valve to allow cold water to enter the tank.
- This will help to flush out any remaining sediment.
Repeat the process until the water runs clear:
- Once again, attach the hose to the drain valve and place the other end in a suitable drainage area.
- Open the drain valve slowly, allowing the water to flow out.
- Keep an eye on the water; when it runs clear, close the valve once more.
- Remove the hose from the drain valve and close the hot water faucet.
Remember, regular maintenance, including flushing out sediment, is crucial to keep your water heater functioning efficiently. By following these steps, you can ensure clean and clear water flow, prolonging its lifespan and avoiding potential issues down the line.
Step 5: Refill The Water Heater
To flush sediment out of a water heater, follow Step 5: Refill the water heater. This essential step ensures that the system is properly functioning and ready to provide hot water.
To ensure your water heater operates efficiently, it’s crucial to refill the tank properly after flushing out sediment. Follow these steps to complete the process:
- Close the pressure relief valve and the drain valve: Once the sediment has been flushed out, close both the pressure relief valve and the drain valve. This will prevent water from escaping and allow the tank to fill properly.
- Open the water supply valve and allow the tank to fill: Locate the water supply valve connected to your water heater and slowly open it. This will allow water to flow into the tank and fill it up. Keep an eye on the water level gauge to monitor the progress.
- Turn on the gas or electricity supply: If your water heater is powered by gas, make sure to relight the pilot and turn on the gas supply after the tank has been refilled. For electric water heaters, turn on the electricity supply. This ensures that the heating element can begin working efficiently to heat the water.
Remember, it’s essential to adhere to proper safety precautions while handling any gas or electrical connections. If you’re unsure or uncomfortable with these tasks, it’s always best to consult a professional plumber or technician for assistance. Your safety is the top priority.
By following these steps, you can maintain the longevity and efficiency of your water heater. Regular sediment flushing and refilling will help prevent clogs and ensure that your water heater operates optimally, providing you with hot water whenever you need it.
Installing A Sediment Filter
Flushing sediment out of a water heater is important for maintaining its efficiency. By installing a sediment filter, you can effectively eliminate buildup and ensure clean water flows through your system.
Sediment buildup is a common problem in water heaters that can lead to reduced efficiency and even damage the heating elements. Installing a sediment filter is an effective way to prevent sediment from reaching your water heater and ensure its proper functioning.
There are different types of sediment filters available, each with its unique features and benefits. Let’s explore some of the options and the installation process:
Types Of Sediment Filters Available
- Spin-down filter: This type of filter relies on a spinning mechanism to separate sediment from the water. As water flows through, larger particles are spun to the bottom, where they can be flushed out manually. Spin-down filters are easy to clean and require minimal maintenance.
- Pleated filter: Pleated filters are designed with a large surface area to catch and remove sediment effectively. Made up of pleated fabric or polyester cartridges, they can trap fine particles and provide longer filter life. Pleated filters are relatively low-cost and can be easily replaced.
- Magnetic filter: As the name suggests, magnetic filters use a magnetic field to attract and capture ferrous sediment particles in your water supply. They are efficient in preventing rust and iron buildup. Magnetic filters are a good option if your water source is prone to metallic deposits.
- Cartridge filter: Cartridge filters come in various sizes and micron ratings, allowing you to choose the one that best suits your water system. They are made up of activated carbon and other filtering materials to remove sediment, chlorine, and other impurities. Cartridge filters need to be replaced periodically.
Installation Process
Installing a sediment filter to protect your water heater is a relatively straightforward process. Here’s a step-by-step guide:
- Choose the right location: Select a suitable spot near your water heater to install the sediment filter. It should be easily accessible for future maintenance.
- Shut off the water supply: Before starting the installation, turn off the water supply to your water heater. This will prevent any water from flowing through the lines during the installation process.
- Drain the water heater: To avoid any potential mess and ensure a clean installation, drain the water heater completely. Attach a hose to the drain valve and open it until all water has been expelled.
- Install the filter housing: Attach the sediment filter housing to the cold water line leading into the water heater. Ensure that the housing is securely fastened to avoid any leaks.
- Insert the filter cartridge: Depending on the filter you’ve chosen, insert the appropriate cartridge into the filter housing. Follow the manufacturer’s instructions to ensure proper installation.
- Connect the plumbing: Connect the inlet and outlet pipes of the filter housing to the existing plumbing system. Use appropriate fittings and ensure tight connections to prevent leaks.
- Turn on the water supply: Once the plumbing connections are secure, turn on the water supply to the water heater. Check for any leaks and make necessary adjustments if required.
- Flush the system: To remove any loose sediment or carbon fines from the filter, run water through the system for a few minutes. This will ensure optimal performance and prevent any clogging issues.
By installing a sediment filter in your water heater system, you can significantly reduce the risk of sediment buildup. Regular maintenance and replacing the filter cartridge according to the manufacturer’s recommendations are essential to maintain the filter’s effectiveness. Protect your water heater and enjoy clean, sediment-free hot water for years to come.
Regular Maintenance Schedule
Regular maintenance is essential to keep your water heater functioning optimally. Flushing out sediment from your water heater is crucial to prevent buildup and prolong its lifespan. By following the correct steps, you can easily flush out sediment and ensure efficient performance.
Regular maintenance is crucial to ensure the smooth functioning of your water heater and extend its lifespan. One key aspect of maintenance is flushing sediment out of the water heater on a regular schedule. By doing this, you can prevent the accumulation of sediment and improve the efficiency and performance of your water heater.
In this section, we will discuss the frequency of sediment flushing and provide additional maintenance tips to keep your water heater in optimal condition.
Frequency Of Sediment Flushing
Flushing sediment out of your water heater should be done periodically to prevent buildup and maintain its efficiency. The frequency of sediment flushing depends on various factors such as the hardness of the water in your area and the usage patterns of your water heater.
As a general guideline, consider the following recommendations:
- For water heaters powered by gas: It is recommended to flush the sediment every 6-12 months.
- For electric water heaters: Flushing the sediment every 4-6 months is typically sufficient.
Keep in mind that these recommendations might vary depending on your specific circumstances, so it’s important to consult your water heater manufacturer’s instructions or seek professional advice to determine the ideal flushing frequency.
Additional Maintenance Tips To Extend The Lifespan Of Your Water Heater
In addition to regular sediment flushing, there are several other maintenance tasks you can perform to maximize the lifespan of your water heater. Consider the following tips:
- Insulate your water heater: Insulating your water heater can help reduce heat loss and improve energy efficiency. Use an insulating blanket specifically designed for water heaters to cover the tank.
- Check the pressure relief valve: The pressure relief valve is an essential safety feature of your water heater. Regularly inspect and test the valve to ensure it is functioning correctly. If you notice any issues, such as leaks or unusual sounds, consult a professional plumber.
- Maintain proper clearance: Ensure that your water heater has sufficient clearance from surrounding objects or flammable materials according to the manufacturer’s guidelines. This helps prevent potential hazards and allows for proper ventilation.
- Check for leaks: Periodically inspect all the fittings, connections, and pipes associated with your water heater for any signs of leaks or corrosion. Address any leaks promptly as they can lead to water damage and compromise the efficiency of your water heater.
- Adjust temperature settings: Consider lowering the temperature setting on your water heater to save energy. Many households find that a temperature of around 120 degrees Fahrenheit (49 degrees Celsius) is sufficient for their needs.
- Schedule professional maintenance: It is advisable to have your water heater professionally inspected and serviced annually. A qualified technician can identify and address any potential issues before they become major problems.
By following these maintenance tips and adhering to a regular flushing schedule, you can enhance the performance and longevity of your water heater. Remember, proper maintenance not only saves you money in the long run but also ensures a consistent supply of hot water for your daily needs.
Enjoy The Benefits Of A Sediment-Free Water Heater
Enjoy the benefits of a sediment-free water heater with our step-by-step guide on how to flush sediment out of your water heater. Follow these easy instructions to improve the performance and extend the lifespan of your water heater.
Is your water heater experiencing reduced efficiency or shorter lifespan? It may be due to sediment buildup in the tank. Flushing out the sediment can help to restore your water heater’s performance and prolong its lifespan. By following the simple steps outlined below, you can enjoy the benefits of a sediment-free water heater.
Longer Lifespan:
- Flushing sediment from your water heater can extend its lifespan
- Sediment buildup can cause corrosion and damage to the tank
- Regular maintenance, including flushing, helps prevent costly repairs and replacements
Improved Efficiency:
- Sediment accumulation can decrease the efficiency of your water heater
- Flushing out the sediment allows for better heat transfer
- Improved efficiency leads to faster heating and a more reliable supply of hot water
Lower Energy Bills:
- A sediment-free water heater consumes less energy
- Sediment acts as an insulator, making the heating process less efficient
- Flushing out the sediment promotes energy savings and reduces your utility bills
By taking the time to flush sediment out of your water heater, you can enjoy a longer-lasting appliance, improved efficiency, and lower energy bills. The process is relatively simple and can be done as part of regular maintenance. Remember to consult your water heater’s manual for specific instructions, and always exercise caution when working with hot water and electrical components.

Credit: www.landmarkhw.com
Frequently Asked Questions Of How To Flush Sediment Out Of A Water Heater?
What Will Dissolve Sediment In Water Heater?
To dissolve sediment in a water heater, you can use vinegar or a descaling agent. Vinegar, a natural and cost-effective solution, contains acetic acid that helps break down the sediment build-up. Simply drain the water heater and pour vinegar into it.
Leave the vinegar to soak for a few hours, then flush the tank and pipes with clean water. For more stubborn sediment, you may need to use a commercially available descaling agent specifically designed for water heaters. Follow the instructions on the product carefully, as different agents may vary in their application and contact time.
Regular maintenance and flushing the tank can also prevent sediment build-up in the future. Remember to consult the manufacturer’s guidelines before performing any maintenance to ensure proper care for your water heater.
How Do You Drain Sediment Out Of A Hot Water Heater?
To drain sediment from a hot water heater, follow these simple steps. Begin by turning off the power supply or shutting off the gas valve. Allow the water to cool down for a few hours. Next, connect a garden hose to the drain valve located near the bottom of the tank.
Place the other end of the hose in a safe drainage area or a floor drain. Open the valve and let the water flow out. Be cautious as the water might be hot. Once the tank is empty, close the drain valve and remove the hose.
Slowly turn the water supply back on. To ensure the sediment is fully flushed out, repeat these steps a few times if needed. Regularly draining the sediment will help improve the performance and lifespan of your hot water heater.
Can I Flush My Water Heater Myself?
Yes, you can flush your water heater yourself. Flushing your water heater helps remove sediment buildup and improves its efficiency. To flush it, follow these steps: 1. Turn off the power or gas supply to the water heater. 2. Attach a garden hose to the drain valve at the bottom of the heater.
3. Position the other end of the hose where the water can safely drain. 4. Turn on a hot water faucet in your home to relieve pressure. 5. Open the drain valve and let the water flow out. 6. Once the water is clear, close the drain valve and remove the hose.
7. Turn on the incoming water supply to refill the tank. 8. After it is completely filled, turn on the power or gas supply. Remember to consult your water heater’s manual for specific instructions and safety precautions.
How Long Does It Take To Flush Sediment Out Of Hot Water Heater?
Flushing sediment from a hot water heater typically takes about 1-2 hours. Sediment can build up over time in the tank, reducing efficiency and potentially damaging the heater. To flush the sediment, follow these steps: 1. Turn off the power or gas supply to the heater.
2. Attach a garden hose to the drain valve at the bottom of the tank. 3. Run the hose to a floor drain or outside. 4. Open the drain valve and let the water flow out until clear. 5. Close the drain valve, remove the hose, and turn the water supply back on.
6. Open a hot water faucet in your house to allow air into the system. 7. Once the water runs clear from the faucet, close it. 8. Finally, turn the power or gas supply back on. Flushing your hot water heater annually can help prolong its lifespan and maintain its efficiency.
Conclusion
Regular maintenance of your water heater is crucial to ensure its longevity and efficiency. Flushing sediment out of your water heater can significantly improve its performance and help avoid costly repairs or replacements. By following the step-by-step process outlined in this blog post, you can easily and effectively remove sediment buildup in your water heater.
Remember to turn off the power and water supply, drain the tank, refill and flush the tank, and then close the drain valve. Regularly flushing your water heater can prevent sediment accumulation, which can lead to reduced heating efficiency and potential damage to the tank and heating elements.
By implementing this simple maintenance task, you can enjoy hot water that flows efficiently and consistently, saving both energy and money in the long run. So, don’t delay, and start flushing the sediment out of your water heater today!